
Component Speakers for Front Doors - How to patch into stock wiring...
 08-14-2009, 11:01 PM
#1
Senior Member
Thread Starter

Join Date: 10-04-2007
Location: Yours To Discover
Posts: 217
Component Speakers for Front Doors - How to patch into stock wiring...
Searched quite a bit trying to find some tips about the simplest way to install new component speakers, replacing the front door speakers and the stock (a-pillar) tweeter locations with new units as well as a separate crossover.
Unfortunately, didn't find too much detail - just a few general comments from others who have done this. So, thought I'd share some thoughts after setting out to do this myself - as easily as possible.
One of the difficulties with the HHR is the trouble encountered trying to run new speaker wire through the hinge pillar grommets and, ultimately, into the doors themselves. The wiring connectors used in the door jams don't easily allow for the passing-through of new speaker wires. This makes for easy and convenient assembly in the assembly plant... but somewhat less fun when trying to install upgraded door speakers and new speaker wires!
In the end, you end up stuck using the stock speaker wires passing through the hinge pillar grommet and into the doors.
(*EDIT: some other possible options are shown in comments within this thread...)
This info is specific to the front doors, and maintaining the door/woofer & a-pillar/tweeter configuration. The other option (tweeter and woofer both in the door, with crossover in the door too) is pretty straightforward.
Assumptions:
- Upgraded oem pioneer system with stock amp in the rear location... OR
- Aftermarket amp in the rear, using existing "premium system" speaker wires that run from the rear to the front of the vehicle
- Big one: that you have some solid experience with wiring and car audio!
- This worked on my 2008 SS. If something looks different on your vehicle or the details below don't quite make sense, DO NOT proceed.
The general idea is:
- Use the existing speaker wiring from the stock amp in the back and up to the front
- Crossovers will be mounted inside the vehicle, at some convenient location at the outboard ends of the instrument panel
- Use the existing speaker wiring to the doors/woofers
- New (but short and simple) wires will be used for the new tweeters in the a-pillar location (from your new crossovers).
Driver's/LH Side Frt Speaker and Tweeter:
- Pull driver's side door sill trim up/off and set aside
- Pull driver's side kick-panel off and set aside (a bit tricky, with the hood release lever there... you actually pull the trim panel towards the rear of the vehicle to remove it)
- Fold carpet away from rocker/sill/kick-panel area, towards center of vehicle.
- With carpet pulled out of the way, you will see a very large bundle of wires running along the floor, then towards and up the kick panel
The problem? --> which wires are the +ve and -ve wires for the Driver's front door speaker? It's a pretty big bundle!
We know two things about them based on other forum posts with the wiring diagrams (try search function):
1. One speaker wire is Tan (+ve)... the other is Gray (-ve)
2. They are relatively-large gauge wires (perhaps 16ga), compared to some of the others in the bundle
Unfortunately, there are a few tan and gray wires in the bundle.
The key is that the correct tan and gray pair is the set that are twisted together (like licorice). You'll notice that most of the other wires just run parallel/straight in the bundle... the speaker ones are twisted together as a pair - one tan, one gray, and both relatively-heavy in gauge compared to the others.
These are the wires you need to use... for the input to your new crossover, and then from the crossover (woofer out) back to these wires.
Personally, I cut the wires in half and then used bullet connectors. This allows for easy splicing-in of the crossover (with some short speaker wire leads to/from the crossover, also with bullet connectors) and also easily removing the crossover and re-attaching the wires, in their original configuration (no crossover).

- The wire "halves" from the rear of the vehicle will go to the input +ve/-ve on your crossover (make some short/separate speaker wire leads to go from here to the crossover... use your method of choice to splice the leads to the oem wires).
- The wire "halves" heading towards the front of the vehicle go to the "woofer" +ve/-ve on the crossover (again, make some short/separate speaker wire leads to go from here to the crossover, using your method of choice for splicing in the extra wire)
- You'll need to find a suitable place to mount the crossover under the dash somewhere... double-sided tape (or carpet tape) usually works good for attaching the crossover to something.
- You'll need to run new speaker wire from the "tweeter +ve and -ve" on the crossover to your new tweeter in the a-pillar.
- Note that the oem tweeter wires/connector don't get used for anything... and wouldn't work for a tweeter now anyway since only the "lower" woofer frequency range will pass through this oem tweeter cable now
- You'll also need to get creative with how you mount the tweeter to the backside of the a-pillar trim, assuming you want to keep your install stealth-like and avoid cutting up the a-pillar trim.
- Also, don't forget to install the new woofer in the door! Of course, you know that already
Passenger/RH Side Frt Speaker and Tweeter:
Essentially the same steps...
- Remove Door sill trim, Kick Panel trim etc.
- Pull back carpet, away from the rocker and kick panel area
- You'll see a wiring bundle running along the floor and up towards the kick panel... this bundle will be a good bit smaller than the one on the driver's side.
- Frt Speaker wires for this side (RHS/passenger side) are:
- Light Green (+ve)
- Dark Green (-ve)
- Again, there are many green wires in the bundle but the two we are after are twisted together like licorice, and relatively heavy-gauge compared to the others.
- Once found, "insert" crossover as done on the driver's side

- The wire "halves" coming from the rear of the vehicle go to the +ve/-ve "input" part of your crossover.
- The "halves" going toward the front of the vehicle will go to the "woofer" +ve and -ve part of your crossover.
- New wires are needed, to go from your crossover ("tweeter" +ve and -ve) to the new tweeter in the a-pillar area
- You'll need to mount crossover somewhere suitable/convenient under the dash... mount tweeter to a-pillar trim creatively, install woofer in door etc.
That's it. The key bit of info here is really where it is easiest to patch into the stock wires and how to locate them, given the rather large bundle of possibilities! Again, look for the pairs that are twisted together within the bundles. I'm not certain if all HHRs are like this, but it was very obvious on mine.
Will add some pictures here soon... that will surely be more helpful than the giant essay I just wrote above!
Have Fun!
D
Unfortunately, didn't find too much detail - just a few general comments from others who have done this. So, thought I'd share some thoughts after setting out to do this myself - as easily as possible.
One of the difficulties with the HHR is the trouble encountered trying to run new speaker wire through the hinge pillar grommets and, ultimately, into the doors themselves. The wiring connectors used in the door jams don't easily allow for the passing-through of new speaker wires. This makes for easy and convenient assembly in the assembly plant... but somewhat less fun when trying to install upgraded door speakers and new speaker wires!
In the end, you end up stuck using the stock speaker wires passing through the hinge pillar grommet and into the doors.
(*EDIT: some other possible options are shown in comments within this thread...)
This info is specific to the front doors, and maintaining the door/woofer & a-pillar/tweeter configuration. The other option (tweeter and woofer both in the door, with crossover in the door too) is pretty straightforward.
Assumptions:
- Upgraded oem pioneer system with stock amp in the rear location... OR
- Aftermarket amp in the rear, using existing "premium system" speaker wires that run from the rear to the front of the vehicle
- Big one: that you have some solid experience with wiring and car audio!
- This worked on my 2008 SS. If something looks different on your vehicle or the details below don't quite make sense, DO NOT proceed.
The general idea is:
- Use the existing speaker wiring from the stock amp in the back and up to the front
- Crossovers will be mounted inside the vehicle, at some convenient location at the outboard ends of the instrument panel
- Use the existing speaker wiring to the doors/woofers
- New (but short and simple) wires will be used for the new tweeters in the a-pillar location (from your new crossovers).
Driver's/LH Side Frt Speaker and Tweeter:
- Pull driver's side door sill trim up/off and set aside
- Pull driver's side kick-panel off and set aside (a bit tricky, with the hood release lever there... you actually pull the trim panel towards the rear of the vehicle to remove it)
- Fold carpet away from rocker/sill/kick-panel area, towards center of vehicle.
- With carpet pulled out of the way, you will see a very large bundle of wires running along the floor, then towards and up the kick panel
The problem? --> which wires are the +ve and -ve wires for the Driver's front door speaker? It's a pretty big bundle!
We know two things about them based on other forum posts with the wiring diagrams (try search function):
1. One speaker wire is Tan (+ve)... the other is Gray (-ve)
2. They are relatively-large gauge wires (perhaps 16ga), compared to some of the others in the bundle
Unfortunately, there are a few tan and gray wires in the bundle.
The key is that the correct tan and gray pair is the set that are twisted together (like licorice). You'll notice that most of the other wires just run parallel/straight in the bundle... the speaker ones are twisted together as a pair - one tan, one gray, and both relatively-heavy in gauge compared to the others.
These are the wires you need to use... for the input to your new crossover, and then from the crossover (woofer out) back to these wires.
Personally, I cut the wires in half and then used bullet connectors. This allows for easy splicing-in of the crossover (with some short speaker wire leads to/from the crossover, also with bullet connectors) and also easily removing the crossover and re-attaching the wires, in their original configuration (no crossover).
- The wire "halves" from the rear of the vehicle will go to the input +ve/-ve on your crossover (make some short/separate speaker wire leads to go from here to the crossover... use your method of choice to splice the leads to the oem wires).
- The wire "halves" heading towards the front of the vehicle go to the "woofer" +ve/-ve on the crossover (again, make some short/separate speaker wire leads to go from here to the crossover, using your method of choice for splicing in the extra wire)
- You'll need to find a suitable place to mount the crossover under the dash somewhere... double-sided tape (or carpet tape) usually works good for attaching the crossover to something.
- You'll need to run new speaker wire from the "tweeter +ve and -ve" on the crossover to your new tweeter in the a-pillar.
- Note that the oem tweeter wires/connector don't get used for anything... and wouldn't work for a tweeter now anyway since only the "lower" woofer frequency range will pass through this oem tweeter cable now
- You'll also need to get creative with how you mount the tweeter to the backside of the a-pillar trim, assuming you want to keep your install stealth-like and avoid cutting up the a-pillar trim.
- Also, don't forget to install the new woofer in the door! Of course, you know that already
Passenger/RH Side Frt Speaker and Tweeter:
Essentially the same steps...
- Remove Door sill trim, Kick Panel trim etc.
- Pull back carpet, away from the rocker and kick panel area
- You'll see a wiring bundle running along the floor and up towards the kick panel... this bundle will be a good bit smaller than the one on the driver's side.
- Frt Speaker wires for this side (RHS/passenger side) are:
- Light Green (+ve)
- Dark Green (-ve)
- Again, there are many green wires in the bundle but the two we are after are twisted together like licorice, and relatively heavy-gauge compared to the others.
- Once found, "insert" crossover as done on the driver's side
- The wire "halves" coming from the rear of the vehicle go to the +ve/-ve "input" part of your crossover.
- The "halves" going toward the front of the vehicle will go to the "woofer" +ve and -ve part of your crossover.
- New wires are needed, to go from your crossover ("tweeter" +ve and -ve) to the new tweeter in the a-pillar area
- You'll need to mount crossover somewhere suitable/convenient under the dash... mount tweeter to a-pillar trim creatively, install woofer in door etc.
That's it. The key bit of info here is really where it is easiest to patch into the stock wires and how to locate them, given the rather large bundle of possibilities! Again, look for the pairs that are twisted together within the bundles. I'm not certain if all HHRs are like this, but it was very obvious on mine.
Will add some pictures here soon... that will surely be more helpful than the giant essay I just wrote above!
Have Fun!
D
Last edited by HPVOHHR; 08-17-2009 at 06:02 PM. Reason: Add pictures
 08-15-2009, 10:43 AM
#2
Senior Member

Join Date: 08-03-2009
Location: D.C., Md., Va. area
Posts: 837
Personally, I cut the wires in half and then used bullet connectors. This allows for easy splicing-in of the crossover (with some short speaker wire leads to/from the crossover, also with bullet connectors) and also easily removing the crossover and re-attaching the wires, in their original configuration (no crossover).
D
08-15-2009, 12:42 PM
#3
Senior Member
Thread Starter
Join Date: 10-04-2007
Location: Yours To Discover
Posts: 217
Unfortunately, the wires themselves don't pass from inside the passenger cabin and into the door.
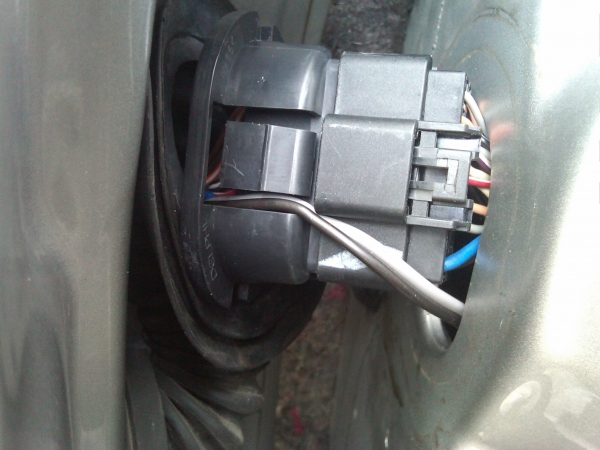
At the hinge pillar area, where the rubber grommet interfaces with the body, is a large 20 conductor connector. A similar mating connector attaches from the door side.
This is why it's problematic to fish new wires through... cuz the wires actually end at the connector, with the connector preventing new wires from passing through

Also, since the rubber grommet itself is designed with this connector contraption in mind, you can't run a separate speaker wire through the grommet the way most people are used to. (especially if you want the grommet to function properly and keep water out of your vehicle!)
Not sure if this description is clear but if you open one of your doors and pull the rubber grommet away from the body/hinge pillar interface, you'll see the plastic wiring connector/coupler hiding underneath.
Last edited by HPVOHHR; 08-15-2009 at 01:49 PM.
08-15-2009, 03:09 PM
#4
Senior Member

Join Date: 02-12-2009
Location: Boutte, Louisiana
Posts: 534
i went ahead and ran all new wires to the doors and A-pillars from my crossover. i'm runnin a seperate amp for mids and highs, so using the factory wires wasn't really an option for me, nor did i want to splice audio wires. i had very little trouble fishing the wires through the door loom ( take your time, and don't get frustrated ). just slip off the rubber grommet, pull out and disconnect the wiring harness, and pull the new wire through. there is plenty of play in the door loom, so the extra wire isn't being pinched or compromised at all. here's a couple pics to explain a little better...

08-15-2009, 03:57 PM
#5
Senior Member

Join Date: 12-14-2007
Location: Toronto ON Canada
Posts: 2,964
And also, a great place to mount crossovers is in the sides of the dash. The small trim panels facing the doors just unclip and there is a good amount of space inside with metal mounting surface.
08-15-2009, 07:19 PM
#6
Senior Member
Thread Starter
Join Date: 10-04-2007
Location: Yours To Discover
Posts: 217
Thanks for the pictures lunchbox_mafioso... I see where you snuck the wires through/beside the connector, by the cutouts near the retention clips.
prod - thanks for the suggestion for a potential hiding spot for the crossovers... that's definitely a convenient location.
Good to see feedback from everyone with a few different options... hopefully this will be helpful for those who decide to tackle a similar project.
D
prod - thanks for the suggestion for a potential hiding spot for the crossovers... that's definitely a convenient location.
Good to see feedback from everyone with a few different options... hopefully this will be helpful for those who decide to tackle a similar project.
D
08-15-2009, 10:09 PM
#7
Senior Member

Join Date: 07-19-2008
Location: Somewhere
Posts: 183
I just did something similar going through the doors. On mine, the block was a little different and had slots at the top and bottom. One caution, there are notches that you may be tempted to use. I would advise against using them, the rubber sleeves have tabs to fit into those notches. Each slot was big enough for 16 gauge wire. Running the wire for the tweeters in the column is pretty easy.
Rob
Rob
08-16-2009, 02:47 AM
#8
Senior Member
Join Date: 08-03-2009
Location: D.C., Md., Va. area
Posts: 837
Damn Damn Damn. Thanks for all the responses. Next question for the panel owners out there................( drum roll, followed by suspenseful pause ) I'm toying with the idea of doing a 13TW5 and possibly a 500/1 in each rear door. Do the panel doors have the same issue as the front doors with the connectors?
01-25-2010, 10:19 PM
#9
Member

Join Date: 05-10-2008
Location: El Paso, TX
Posts: 59
Digging up an old thread since I'm about to throw some speakers in my doors. Does the speaker wire that goes to the woofer in the door carry both highs and lows? Or does the tweeter have its own line from the amp? I am putting 2 ways in my doors, and I want to make sure they will be getting all the frequecies from the amp, not just the lows. Thanks.
01-26-2010, 01:17 AM
#10
Senior Member
Join Date: 12-14-2007
Location: Toronto ON Canada
Posts: 2,964
It is a direct splice under the dash, just before the wires go into the door pillar. So all frequencies go to the door, while the a-pillar tweeter just has a capacitor on it to filter out the lows.