
Ground Force Rear Leveling Springs


 06-25-2009, 12:40 PM
#3
Senior Member
Thread Starter

Join Date: 05-13-2009
Location: Western North Carolina
Posts: 466
06-26-2009, 12:32 PM
#5
Senior Member
Thread Starter
Join Date: 05-13-2009
Location: Western North Carolina
Posts: 466
Here is my install story:
Got my springs installed late last nite. My buddy came over & didn't leave until 11:00 PM . This delayed the project so I started kind of late. Got out into the garage about 11:15pm & finished around 12:30AM. This install took a little longer than usual because I had to take pictures for all my HHR.net buddies
 . This was distracting at times. Remove a bolt, stop take a picture. Should I take a picture of this? What, my camera needs batteries? haha Overall I would say this was a pretty easy install (for me). I broke a sweat but that may have been the 90 degree heat & camera stress haha. I measured the stock height:

The kit comes with full instructions & I advise you to read & follow only those directions. I am merely posting my install experience for my fellow HHR brothers & sisters. I started by jacking up the rear end so I could remove the wheels. I followed the HHR owner's manual instructions. I set the parking brake & put wheel chocks under the front tires. I used jack stands to secure the vehicle. I removed the wheels.

. This delayed the project so I started kind of late. Got out into the garage about 11:15pm & finished around 12:30AM. This install took a little longer than usual because I had to take pictures for all my HHR.net buddiesThe kit comes with full instructions & I advise you to read & follow only those directions. I am merely posting my install experience for my fellow HHR brothers & sisters. I started by jacking up the rear end so I could remove the wheels. I followed the HHR owner's manual instructions. I set the parking brake & put wheel chocks under the front tires. I used jack stands to secure the vehicle. I removed the wheels.
06-26-2009, 12:41 PM
#6
Senior Member
Thread Starter
Join Date: 05-13-2009
Location: Western North Carolina
Posts: 466
I then loosened & removed the 10mm nuts that hold the brake line in place. This will allow the suspension arm to rotate down all the way & not damage up the brake line.

I put a jack under each suspension arm to support it while I remove the bottom shock bolts. The instructions note that the arm could 'spring out' quickly when the shock bolt is removed. It didn't happen to me but be careful! I used the lug nut wrench to remove the shock bolts.


I put a jack under each suspension arm to support it while I remove the bottom shock bolts. The instructions note that the arm could 'spring out' quickly when the shock bolt is removed. It didn't happen to me but be careful! I used the lug nut wrench to remove the shock bolts.
06-26-2009, 12:55 PM
#7
Senior Member
Thread Starter
Join Date: 05-13-2009
Location: Western North Carolina
Posts: 466
With the shock bolts out I was able to lower the whole rear suspension arm with the jacks. I then grabbed the spring & wrestled it out. They were in there tight because of dirt & crustification but I was able to 'pop' them out by grabbing the spring with both hands & using a twisting motion.

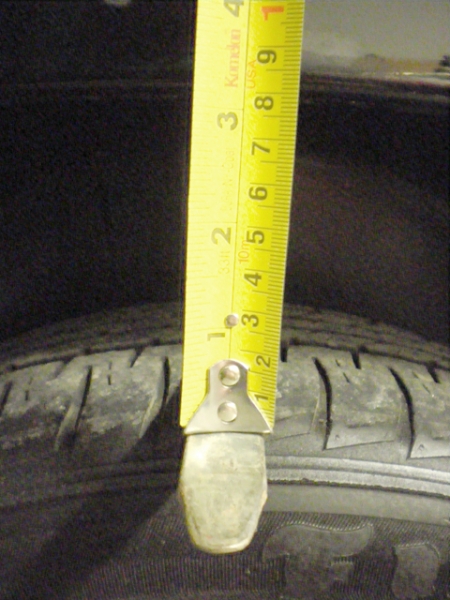
I then removed the top & bottom plastic pieces from each stock spring, cleaned said pieces & re-installed them into my shiny-new Ground Control springs.


Note the 1" difference in (free) spring length.

There is a note to install the rear springs with Ground Force logo 'up'. These are ready to go!

Re-installing the springs was easier because they are shorter. Jacks under the suspension & re-install the lower shock bolts. Re-install the 10mm brake line nuts.


Re-install the wheels.
Road test. I could feel the lower stance right away. It wasn't 'squatting' in the rear, just level
Hanlding on my quick around the block road test revealed a new handling feel. With the rear end high, it tended to turn-in easier (maybe too easy). Know it tends to 'drive through' the turn instead of falling into & out of it.
Before & after pics will be posted soon!
I then removed the top & bottom plastic pieces from each stock spring, cleaned said pieces & re-installed them into my shiny-new Ground Control springs.
Note the 1" difference in (free) spring length.
There is a note to install the rear springs with Ground Force logo 'up'. These are ready to go!
Re-installing the springs was easier because they are shorter. Jacks under the suspension & re-install the lower shock bolts. Re-install the 10mm brake line nuts.
Re-install the wheels.
Road test. I could feel the lower stance right away. It wasn't 'squatting' in the rear, just level
Hanlding on my quick around the block road test revealed a new handling feel. With the rear end high, it tended to turn-in easier (maybe too easy). Know it tends to 'drive through' the turn instead of falling into & out of it.
Before & after pics will be posted soon!

