
Door Poppers - any adjustment ? HHR Panel
 02-25-2019, 11:09 PM
#21
Senior Member
Thread Starter

Join Date: 11-04-2018
Location: Iowa
Posts: 273
Had same problem with back doors on the wife�s panel when we got it 5 years ago. Took it
to my friend who owns a hotrod shop and had him install aftermarket poppers. Now the doors
open with no issues. Just have to close the door harder due to spring pressure but it�s easier to
do that than be aggravated with them not opening.
to my friend who owns a hotrod shop and had him install aftermarket poppers. Now the doors
open with no issues. Just have to close the door harder due to spring pressure but it�s easier to
do that than be aggravated with them not opening.
I have 2 HHR Panels, one works so-so the other makes the Pop Sounds 1 or 2 twice but doesn't pop door.
Feels like weak springs, but not sure since not aware of what it should be for tension.

 02-26-2019, 12:02 AM
#23
Senior Member
Thread Starter
Join Date: 11-04-2018
Location: Iowa
Posts: 273
I haven't taken door panels off yet to examine, and not visualizing the parts. It's cold as heck here in Iowa so removing plastic panels won't happen til a bit warmer.
The actual solenoid to release the latch in not the popper correct? I've read where several indicate it's the wether seal that physically opens the door.
I'm visualizing there is a spring plunger performing the physical door open pop. But not understanding where this poper is located and what it pushes against to open door.
Is it pushing against the back of the "door check link"?
Do the aftermarket plungers replace the OEM plunger?
02-26-2019, 12:10 AM
#24
Senior Member
Thread Starter
Join Date: 11-04-2018
Location: Iowa
Posts: 273
I've found these in various places... or similar to these.
https://www.ebay.com/itm/2PCS-New-Un...R40:rk:41:pf:0
Did you drill and mount in door or place behind link?
https://www.ebay.com/itm/2PCS-New-Un...R40:rk:41:pf:0
Did you drill and mount in door or place behind link?
 02-26-2019, 03:38 PM
#27
Senior Member
Thread Starter
Join Date: 11-04-2018
Location: Iowa
Posts: 273
Thanks @CatManHHR, I've been curious on these Poppers and methods to improve. Nothing more frustrating, hands full and unsuccessful door pop requiring an inside handle entry.
Had a few email conversations with @Hotrodguy34 and a few photos. His poppers are placed in door jam lower corner outer edge, same area I was considering to improve successful pop compared to hinge side. The body has a nice flat surface area that looks perfect to add a popper.
I still need to pull the panel to see how the original popper spring / tension is configured... and see if there I can see any way to improve the tension beyond the TSB adding a few washers.
I looked through a few PDF manuals, didn't locate any close up picture of the popper section inside the door panel... just the TSB showing the Link asmb.
Anyone know what the actual "tension" mechanism to pop the door is on the OEM setup? I've read it's the weather strip seal, which seems a be weak to me, to many variables that would often produce a no-pop activation. The "head" on Link within door panel looks like it might have a plunger or something on the back side to push the link outward. The washer suggestion would move the link & asmb further back towards tension too.
 02-26-2019, 06:50 PM
#29
Administrator

Join Date: 10-13-2011
Location: Welland,Ont Canada
Posts: 37,590
In here, have you read this from ChevyMgr in the way back machine
#09-08-64-001: Rear Side Cargo Door Not Opening With Button Activation (Add Washers to Check Link) - (Jan 5, 2009)
Subject: Rear Side Cargo Door Not Opening With Button Activation (Add Washers to Check Link)
Models: 2008-2009 Chevrolet HHR Panel Van
--------------------------------------------------------------------------------
Condition
Some customers may comment that the rear side cargo door(s) intermittently will not release open upon first activation of the instrument panel (IP) buttons, or by using the key fob.
Cause
Assembly variation may be causing the door latch mechanism to stick or only release intermittently.
Correction
Note: Ensure that the door latch does react to the IP and key fob buttons, and that there is no drag between the latch and striker.
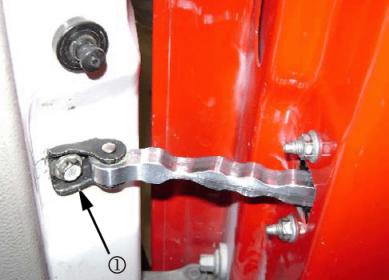
Remove the bolt (1) holding the rear side cargo door check link bracket to the "B" pillar.
Add a 2 mm thick washer (1), P/N 11609679, or equivalent, to the bolt. Slide the washer onward to rest against the outer surface of the bracket.
Position the check link bracket to the B pillar and reinstall the bolt.
Tighten
Tighten the bolt to 20 N�m (15 lb ft).
Verify that the door is releasing open upon first activation of the IP or key fob buttons. If the door is releasing properly, repair is complete. If the condition has NOT been corrected, continue on to step 5.
Remove the rear side cargo door interior trim panel. Refer to Rear Side Door Trim Panel Replacement in SI.
Pull the top front edge of the water deflector downward to gain access to the check link.
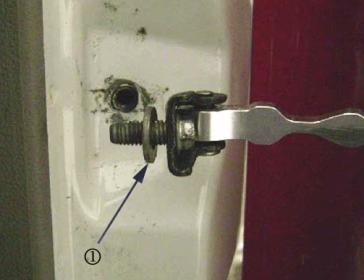
Remove the "B" pillar bolt (1) and the nuts (2) retaining the check link to the door.
Remove the check link through the inside of the door.
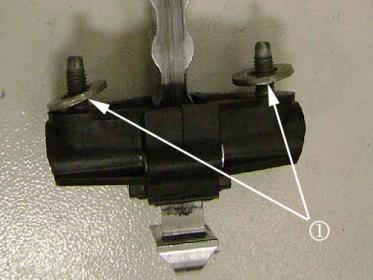
Add a 2 mm thick washer (1) , P/N 11609679, or equivalent, to each bolt on the check link (two total). Slide them onward to rest against the body of the check link.
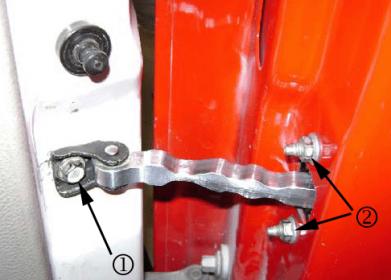
Reinstall the check link through the inside of the door, and position the check link to the inner door frame.
Install the nuts (2) that retain the check link to the door.
Tighten
Tighten the nuts to 10 N�m (89 lb in).
Position the check link bracket to the "B" pillar and reinstall the bolt (1) with washer.
Tighten
Tighten the bolt to 20 N�m (15 lb ft).
Verify that the door is releasing open upon first activation of the IP or key fob buttons.
Install the door trim panel. Refer to Rear Side Door Trim Panel Replacement in SI.
Parts Information
Part Number Description Qty
11609679 Washer (2 mm thick) 10 per package
#09-08-64-001: Rear Side Cargo Door Not Opening With Button Activation (Add Washers to Check Link) - (Jan 5, 2009)
Subject: Rear Side Cargo Door Not Opening With Button Activation (Add Washers to Check Link)
Models: 2008-2009 Chevrolet HHR Panel Van
--------------------------------------------------------------------------------
Condition
Some customers may comment that the rear side cargo door(s) intermittently will not release open upon first activation of the instrument panel (IP) buttons, or by using the key fob.
Cause
Assembly variation may be causing the door latch mechanism to stick or only release intermittently.
Correction
Note: Ensure that the door latch does react to the IP and key fob buttons, and that there is no drag between the latch and striker.
Remove the bolt (1) holding the rear side cargo door check link bracket to the "B" pillar.
Add a 2 mm thick washer (1), P/N 11609679, or equivalent, to the bolt. Slide the washer onward to rest against the outer surface of the bracket.
Position the check link bracket to the B pillar and reinstall the bolt.
Tighten
Tighten the bolt to 20 N�m (15 lb ft).
Verify that the door is releasing open upon first activation of the IP or key fob buttons. If the door is releasing properly, repair is complete. If the condition has NOT been corrected, continue on to step 5.
Remove the rear side cargo door interior trim panel. Refer to Rear Side Door Trim Panel Replacement in SI.
Pull the top front edge of the water deflector downward to gain access to the check link.
Remove the "B" pillar bolt (1) and the nuts (2) retaining the check link to the door.
Remove the check link through the inside of the door.
Add a 2 mm thick washer (1) , P/N 11609679, or equivalent, to each bolt on the check link (two total). Slide them onward to rest against the body of the check link.
Reinstall the check link through the inside of the door, and position the check link to the inner door frame.
Install the nuts (2) that retain the check link to the door.
Tighten
Tighten the nuts to 10 N�m (89 lb in).
Position the check link bracket to the "B" pillar and reinstall the bolt (1) with washer.
Tighten
Tighten the bolt to 20 N�m (15 lb ft).
Verify that the door is releasing open upon first activation of the IP or key fob buttons.
Install the door trim panel. Refer to Rear Side Door Trim Panel Replacement in SI.
Parts Information
Part Number Description Qty
11609679 Washer (2 mm thick) 10 per package
02-26-2019, 07:03 PM
#30
Senior Member

Join Date: 10-01-2018
Location: Downingtown, PA
Posts: 312
I've never actually seen the popper in action on my car. I've had the door open, hit the button on the remote and looked - not ever seeing the actual popper move. It almost sounds like it's coming from inside the door, but I'll be darned if I can find it.