
Removing Speedometer Cluster?
 08-23-2006, 03:31 PM
#11
Senior Member
Thread Starter

Join Date: 07-17-2006
Location: Beyond the Sun....
Posts: 520
Yes, my original cluster is still in the car. I bought one out of a wreck to send it to get "overlayed". They guys at US Speedo assured me that these clusters do not need to be programmed in any way. (I guess well find out real soon!) As a matter of fact the guy I was talking to claims they are in the process of working out some kind of exchange program with GM on alot of their clusters being how most dont need reprogramming.
Crowbar.....I figured like you, that the cluster prob. pulls right out. I guess I mainly need Info on getting to that point...lol...I.E. how dash pad is removed and all that fun stuff...I wish it were like my 99 tahoe, pull the trim and remove 4 bolts and replace. Took about 4 minutes tops...lol....Regards...Mark
Crowbar.....I figured like you, that the cluster prob. pulls right out. I guess I mainly need Info on getting to that point...lol...I.E. how dash pad is removed and all that fun stuff...I wish it were like my 99 tahoe, pull the trim and remove 4 bolts and replace. Took about 4 minutes tops...lol....Regards...Mark

 08-23-2006, 05:53 PM
#14
Senior Member
Thread Starter
Join Date: 07-17-2006
Location: Beyond the Sun....
Posts: 520
Ok, here is how you remove the cluster: (well at least how I did it)
1. Remove 2 screws that are on the upper part of the trim piece that holds in the cluster. Set them aside.
2. Open the center compartment on top the dash and take out the two screws that hold the compartment in. Remove compartment and set aside. Use to hold the screws and bolts you will remove.
3. Pry back the top part of the trim piece that holds the radio on. This will expose the two bolts that hold part of the dash on that need to be removed. Remove them. Set them aside.
4. That is all the screws and bolts that need to be removed on the dash. Now gently start pulling up on the dash just enough to loosen around the cluster.
5. At this point the trim piece around the cluster is ready to be removed. Gently pull the piece toward you until the clips release. (mine was pretty much already falling out already but yours may be different)
6. After removing the trim there should be two exposed bolts, one on each lower corner of the cluster. Remove them and set aside.
7. Now take the cluster and gently pull it toward you and carefully flip it face down to expose the wiring harness and plug. You have to push the release tab on the side of the grey latch that is on the plug. The grey latch is now ready to be pushed down which causes the plug to "pop out" of rear of the cluster.
8. Carefully remove cluster from the opening. Make sure tilt wheel is all the way down it will give you a little more wiggle room.
I just did this as a pre-game for when I get my parts back. I'll try to take a couple of pics. to go along with the how to when I install the new gauges. Regards.......Mark
08-23-2006, 07:10 PM
#15
Member

Join Date: 03-21-2006
Location: BC
Posts: 40
Originally Posted by RUDEINC
Yes, they are going to be the white faced overlays. This is the picture that they sent me...But I will add the real thing when I figure out how to get them installed....Regards....Mark 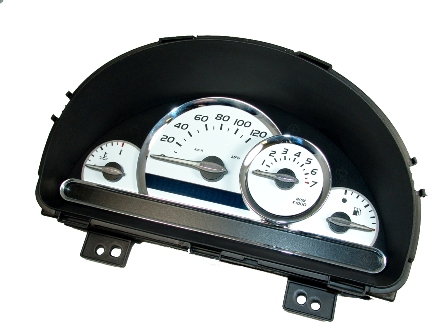
 08-23-2006, 08:01 PM
#17
Senior Member

Join Date: 02-06-2006
Location: North Texas
Posts: 328
I have an '04 Silverado.... I took the cluster out of it, drove it around the block 3-4 times approximately a mile and a half, put it back in and the darn mileage was updated on it. So apparently it is stored in the computer. Perhaps I was lucky Mike, but I still haven't experienced any computer problems with the truck.... and yes, it was coming up on the end of the warranty, so I was prying where I shouldn't have... lol
CBL
CBL
08-23-2006, 08:38 PM
#19
Senior Member

Join Date: 02-03-2006
Location: So Cal
Posts: 1,785
Originally Posted by RUDEINC
Ok, here is how you remove the cluster: (well at least how I did it)
1. Remove 2 screws that are on the upper part of the trim piece that holds in the cluster. Set them aside.
2. Open the center compartment on top the dash and take out the two screws that hold the compartment in. Remove compartment and set aside. Use to hold the screws and bolts you will remove.
3. Pry back the top part of the trim piece that holds the radio on. This will expose the two bolts that hold part of the dash on that need to be removed. Remove them. Set them aside.
4. That is all the screws and bolts that need to be removed on the dash. Now gently start pulling up on the dash just enough to loosen around the cluster.
5. At this point the trim piece around the cluster is ready to be removed. Gently pull the piece toward you until the clips release. (mine was pretty much already falling out already but yours may be different)
6. After removing the trim there should be two exposed bolts, one on each lower corner of the cluster. Remove them and set aside.
7. Now take the cluster and gently pull it toward you and carefully flip it face down to expose the wiring harness and plug. You have to push the release tab on the side of the grey latch that is on the plug. The grey latch is now ready to be pushed down which causes the plug to "pop out" of rear of the cluster.
8. Carefully remove cluster from the opening. Make sure tilt wheel is all the way down it will give you a little more wiggle room.
I just did this as a pre-game for when I get my parts back. I'll try to take a couple of pics. to go along with the how to when I install the new gauges. Regards.......Mark
1. Remove 2 screws that are on the upper part of the trim piece that holds in the cluster. Set them aside.
2. Open the center compartment on top the dash and take out the two screws that hold the compartment in. Remove compartment and set aside. Use to hold the screws and bolts you will remove.
3. Pry back the top part of the trim piece that holds the radio on. This will expose the two bolts that hold part of the dash on that need to be removed. Remove them. Set them aside.
4. That is all the screws and bolts that need to be removed on the dash. Now gently start pulling up on the dash just enough to loosen around the cluster.
5. At this point the trim piece around the cluster is ready to be removed. Gently pull the piece toward you until the clips release. (mine was pretty much already falling out already but yours may be different)
6. After removing the trim there should be two exposed bolts, one on each lower corner of the cluster. Remove them and set aside.
7. Now take the cluster and gently pull it toward you and carefully flip it face down to expose the wiring harness and plug. You have to push the release tab on the side of the grey latch that is on the plug. The grey latch is now ready to be pushed down which causes the plug to "pop out" of rear of the cluster.
8. Carefully remove cluster from the opening. Make sure tilt wheel is all the way down it will give you a little more wiggle room.
I just did this as a pre-game for when I get my parts back. I'll try to take a couple of pics. to go along with the how to when I install the new gauges. Regards.......Mark
Ng
02-16-2021, 03:11 PM
#20
Member

Join Date: 12-23-2017
Location: Florida
Posts: 52
Cluster mileage
Newer cluster mileage and information is retained in the computer, not in the cluster itself. They stopped that after people were swapping clusters to lie about the mileage on cars. I noticed this when i swapped out the clusters on my 2001 GMC Sierra which did retain the mileage in the cluster and my 2002 Saturn L100 that the mileage and other information was retained in the computer.
I read all the posts that I could find on here and felt that it would retain my actual mileage but it now displays the wrong mileage