Camshaft Position Actuator Solenoid Valve Replacement (w. pics) - P0010/11 P0013/14
 11-01-2013, 03:21 PM
#391

Join Date: 11-01-2013
Location: Fenton
Posts: 1
Much Appreciation to Whopper for His Thread!
Whopper ~ Thank you so much for your time on this thread! This is amazing, comprehensive and concise, I've referred  my very sweet very mechanically-challenged boyfriend to 'your thread' here many times. Thank you so much for the how-to, this was perfect and exactly what I was looking for to help him fix his finicky HHR :) I have a feeling I will be reading up on your threads to figure out future HHR problems for some time to come. Very much appreciated. I registered just to personally thank you. :) ~ Ana
my very sweet very mechanically-challenged boyfriend to 'your thread' here many times. Thank you so much for the how-to, this was perfect and exactly what I was looking for to help him fix his finicky HHR :) I have a feeling I will be reading up on your threads to figure out future HHR problems for some time to come. Very much appreciated. I registered just to personally thank you. :) ~ Ana
 11-01-2013, 06:27 PM
#392
New Member

Join Date: 01-10-2008
Location: Murfreesboro, TN
Posts: 28
Thanks for all the priceless info published here. I just finished changing my solenoids. Hopefully my shifting woes are gone. I did encounter one problem. The exhaust solenoid broke off in the engine. As I was wiggling it and lifting, the darn thing broke in half. After some careful nudging with a screwdriver, I was able to lift it enough to grab onto. After that things went pretty smooth. When I fired it up and went to back out, the shift was worse. I shut it down and took another look and found that the MAP sensor was not fully connected. After I snapped that in place everything was smooth. I have over 186000 miles on a 2006. I'd like to keep rolling for a wile longer. Thanks again to all who contribute to this website.
11-01-2013, 08:14 PM
#393
Platinum Member
Thread Starter

Join Date: 04-09-2006
Location: Vancouver, BC, Canada
Posts: 7,034
CMSeabeeChic and gaspergou - Hey glad it worked out for both of you. A whole number of people have contributed to this thread, as well as a huge number of other helpful/insightful ones.
Glad to have you guys on-board. And don't forget, anytime you are looking for something specific, give the SEARCH tool at the top of the page a try. It's a great way to find some interesting stuff to read.
and gaspergou, one broke off in the engine - that's a first - but sure am glad you got it removed ok.
11-15-2013, 06:36 PM
#394

Join Date: 09-21-2013
Location: monroe city mo
Posts: 3
I ordered the parts from this ordered . they were not even close. now have nothing to drive this for the weekend to drive.
 11-16-2013, 03:06 AM
#396
Platinum Member
Thread Starter
Join Date: 04-09-2006
Location: Vancouver, BC, Canada
Posts: 7,034
And you say now you have nothing to drive? If you are meaning you pulled the old solenoids out and the new ones don't fit.... well put the old parts back in.
The part numbers listed here are the correct ones. If you are looking for info or advice, provide more details on what the actual problem is.
11-16-2013, 09:33 PM
#397

Join Date: 11-16-2013
Location: Rochester, MN
Posts: 1
Worked for me too
I aquired a 2006 HHR with the 2.4L engine earlier this year. Within a short time I started getting the ATC light and occasionally the CEL. After a trip to the dealer with no joy, I found this forum -- SUCCESS. So I thought I would offer a few pictures directed at few of the steps in this repair and a couple of the actual parts. But it seems I am not allowed to attach pictures.
OK I was given a good pointer by donbrew on how to post pictures (see next post)
Here is a copy of the provided link:
http://="http://https://www.chevyhhr...php?t=3033%27"
-- THANKS!
First here is a picture of the "Actuator Solenoid Valve"-- valve for short. The 2 with the silver body are the new parts along with the boxs they came in. The one with the black body is the orignial valve from the intake side removed from the engine. The valve for the exhaust side was still in the engine.

First there have been posts about disconnecting the electrical connector. I found that there is a clip that works like a wedge to keep the locking mechanism on the connector from poping open. The first step is to remove the gray clip by depressing the catch that is holding it in. This can be done by either inserting a small tool in the notch as seen from the top of the clip, or pushing the catch from the side -- it can be accessed through the hole in portion of the black connector that can be seen looking at the side instead of the top. Once the catch is depressed the grey clip can be lifed out. The next step is to simply sqeeze the top of the connector -- so that the black part with the hole pivots and releases another catch down inside the connector. The connector can then be pulled free of the valve. --- Don't loose the grey clip. you will need it to reassemble the connector. Which is done by simply pushing the connector onto the valve and then pushing the grey clip back into the space it was removed from.
Here is a picture of the grey clip removed from the connector

Here is the clip seen as it is installed in the connector. The tool is inserted in the notch on the top -- mostly as way to point at the catch on the grey clip. I found it easier to depress the catch through the hole in the black connector -- at the tip of the awl in the picture
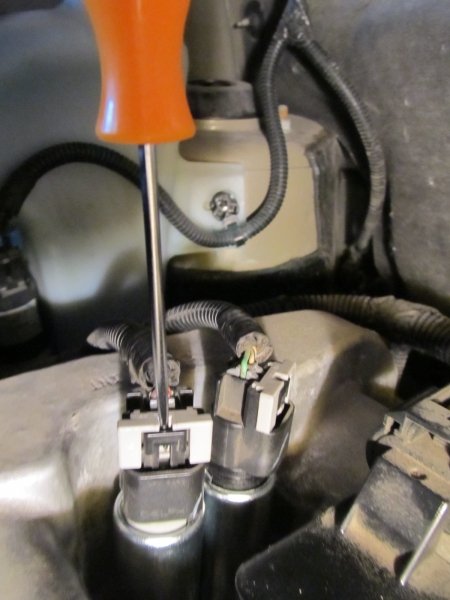
The next step is to remove the valve(s). First clean the area were the valves are inserted into the engine. Any debris can be washed down in the cavity that houses the valve as the valve is withdrawn -- a small amount of oil will be present in the valve and as the valve is withdrawn the oil will wash over any debris and possibly down in the engine -- VERY BAD. Then actually removeing the valves was a bit of a challenge for large fingers. So I found that there is a small gap between the bracket that holds the valve to the engine and the engine -- near the body of the valve. I inserted the tip of an awl that was bent in an "L" shape. I then gently rocked/wiggled the handle of the awl and the valve poped right out.
Here is a view of the valves from above -- Try to get all the loose dirt cleaned out BEFORE the valves are removed

Here is the tool I used to help remove the valves. It came in a set of 4 different tools -- "Mini Pick and Hook Set". Cost was just a couple of dollars at Harbor Freight. These have come in handy for all sorts of odd repairs where small parts are difficult to reach. Another good tool is a used dental pick from your dentist. I have actually seen these for sale at a local auto parts store.

Here is the tool insterted in the gap between the bracket that holds the valve to the engine and the engine.
Note: In this picture the bolts have not been removed yet.

Simply rock and wiggling the tool with moderate force, this will put pressure on the bracket to lift the valve out. I found that simply prying hard did not work well. Rocking or wiggling the tool to give the part several smaller nudges seem to work better and avoid simply bending the tool.
After that I inspected the cavity in the engine for debris, coated the new valve with oil, slid it into the engine, bolted it down, and replaced the connector -- easy
Have not had any ACT or CEL light since
Thanks for all the good info!
OK I was given a good pointer by donbrew on how to post pictures (see next post)
Here is a copy of the provided link:
http://="http://https://www.chevyhhr...php?t=3033%27"
-- THANKS!
First here is a picture of the "Actuator Solenoid Valve"-- valve for short. The 2 with the silver body are the new parts along with the boxs they came in. The one with the black body is the orignial valve from the intake side removed from the engine. The valve for the exhaust side was still in the engine.
First there have been posts about disconnecting the electrical connector. I found that there is a clip that works like a wedge to keep the locking mechanism on the connector from poping open. The first step is to remove the gray clip by depressing the catch that is holding it in. This can be done by either inserting a small tool in the notch as seen from the top of the clip, or pushing the catch from the side -- it can be accessed through the hole in portion of the black connector that can be seen looking at the side instead of the top. Once the catch is depressed the grey clip can be lifed out. The next step is to simply sqeeze the top of the connector -- so that the black part with the hole pivots and releases another catch down inside the connector. The connector can then be pulled free of the valve. --- Don't loose the grey clip. you will need it to reassemble the connector. Which is done by simply pushing the connector onto the valve and then pushing the grey clip back into the space it was removed from.
Here is a picture of the grey clip removed from the connector
Here is the clip seen as it is installed in the connector. The tool is inserted in the notch on the top -- mostly as way to point at the catch on the grey clip. I found it easier to depress the catch through the hole in the black connector -- at the tip of the awl in the picture
The next step is to remove the valve(s). First clean the area were the valves are inserted into the engine. Any debris can be washed down in the cavity that houses the valve as the valve is withdrawn -- a small amount of oil will be present in the valve and as the valve is withdrawn the oil will wash over any debris and possibly down in the engine -- VERY BAD. Then actually removeing the valves was a bit of a challenge for large fingers. So I found that there is a small gap between the bracket that holds the valve to the engine and the engine -- near the body of the valve. I inserted the tip of an awl that was bent in an "L" shape. I then gently rocked/wiggled the handle of the awl and the valve poped right out.
Here is a view of the valves from above -- Try to get all the loose dirt cleaned out BEFORE the valves are removed
Here is the tool I used to help remove the valves. It came in a set of 4 different tools -- "Mini Pick and Hook Set". Cost was just a couple of dollars at Harbor Freight. These have come in handy for all sorts of odd repairs where small parts are difficult to reach. Another good tool is a used dental pick from your dentist. I have actually seen these for sale at a local auto parts store.
Here is the tool insterted in the gap between the bracket that holds the valve to the engine and the engine.
Note: In this picture the bolts have not been removed yet.
Simply rock and wiggling the tool with moderate force, this will put pressure on the bracket to lift the valve out. I found that simply prying hard did not work well. Rocking or wiggling the tool to give the part several smaller nudges seem to work better and avoid simply bending the tool.
After that I inspected the cavity in the engine for debris, coated the new valve with oil, slid it into the engine, bolted it down, and replaced the connector -- easy
Have not had any ACT or CEL light since
Thanks for all the good info!
Last edited by HHR4Dad; 11-17-2013 at 05:08 PM. Reason: Add Pictures
11-16-2013, 09:56 PM
#398
Moderator

Join Date: 01-23-2009
Location: Fredericksburg,VA
Posts: 24,973
I aquired a 2006 HHR with the 2.4L engine earlier this year. Within a short time I started getting the ATC light and occasionally the CEL. After a trip to the dealer with no joy, I found this forum -- SUCCESS. So I thought I would offer a few pictures directed a few of the steps in this repair and a couple of the actual parts. But it seems I am not allowed to attach pictures.
So here is are some words that might help:
First there have been posts about disconnecting the electrical connector. I found that there is a clip that works like a wedge to keep the locking mechanism on the connector from poping open. The first step is to remove the gray clip by depressing the catch that is holding it in. This can be done by either inserting a small tool in the notch as seen from the top of the clip, or pushing the catch from the side -- it can be accessed through the hole in portion of the black connector that can be see looking at the side instead of the top. Once the catch is depressed the grey clip can be lifed out. The next step is to simply sqeeze the top of the connector -- so that the black part with the hole pivots and releases another catch down inside the connector. The connector can then be pulled free of the valve. --- Don't loose the grey clip. you will need it to reassemble the connector. Which is done by simply pushing the connector onto the valve and then pushing the grey clip back into the space it was removed from.
The next step is to remove the valve(s). First clean the area were the valves are inserted into the engine. Any debris can be washed down in the cavity that houses the valve as the valve is withdrawn -- a small amount of oil will be present in the valve and as the valve is withdrawn the oil will wash over any debris and possibly down in the engine -- VERY BAD. Then actually removeing the valves was a bit of a challenge for large fingers. So I found that there is a small gap between the bracket that holds the valve to the engine and the engine -- near the body of the valve. I inserted the tip of an awl that was bent in an "L" shape. I then gently rocked/wiggled the handle of the awl and the valve poped right out.
After that I inspected the cavity in the engine for debris, coated the new valve with oil, slid it into the engine, bolted it down, and replaced the connector -- easy
Have not had any ACT or CEL light since
Thanks for all the good info!
Did you read the first post in this thread? Pics are included and your points are addressed.
Take a look at this link for posting pics
https://www.chevyhhr.net/forums/show....php?t=3033%27
 11-16-2013, 10:03 PM
#399
Platinum Member
Thread Starter
Join Date: 04-09-2006
Location: Vancouver, BC, Canada
Posts: 7,034
HHR4dad - glad it worked out for you. Thanks for the details on that clip - a few people have broken the latching mechanism.
11-17-2013, 01:27 PM
#400
Join Date: 09-21-2013
Location: monroe city mo
Posts: 3
I have a problem. Went to remove the the solenoids and both came apart, i only got the top part off. I have no idea how to get the rest of the solenoids out. Anyone have any ideas?