
Camshaft Position Actuator Solenoid Valve Replacement (w. pics) - P0010/11 P0013/14
 05-10-2016, 11:49 AM
#621
Platinum Member

Join Date: 05-09-2006
Location: "Upland" Mesa, Arizona
Posts: 6,805
Hey here is something that is interesting. Most know that the VVT is controlled by the solenoids, but some do not understand the importance of changing the oil and oil viscosity relative to the VVT operation. This short article from RockAuto provides a little insight. Unfortunately it didn't transfer a few related pictures as well.
Thought this is related to the thread topic so I posted it here. Feel free to move it wherever is necessary.
Those Ingenious VVT Systems
RockAuto
While peering under hoods at classic car shows, I frequently have or overhear conversations about how uncluttered engine compartments used to be in the good old days. Engine compartments from the 1980s look like the "good old days" when compared to those from the 1990s. Every new model year seems to include some new system or adds additional parts to an old system.
Tone down the nostalgia and take heart! There is one automotive system, exhaust gas recirculation (EGR) that not only has peaked in complexity but also has been disappearing from engines built in the last 10+ years. The EGR valve routes some exhaust into the combustion chamber to lower the temperature. This prevents engine knock and reduces nitrogen oxide emissions. After their debut in the early 1970s, EGR systems became steadily more complex as more motors, sensors, etc. were needed to fine tune the flow of exhaust back into the intake manifold.
Newer engines have variable valve timing (VVT) systems that adjust the opening and closing of the engine intake and exhaust valves. VVT helps engine designers improve performance, increase fuel efficiency, enable cylinder deactivation and do other good things including reducing emissions.
If VVT provides precise control over an engine's valves, then why not just use opening/closing of the intake and exhaust valves to retain some exhaust in the combustion chambers rather than tacking on a complex EGR system somewhere downstream in the exhaust system. Keep some exhaust in the combustion chamber by opening the exhaust valve later and/or opening the intake valve a little sooner. EGR valves were no longer needed and engine compartments became slightly less cluttered!
Typically the best way for a vehicle owner to protect one of those ingenious VVT systems is to religiously change the engine oil and use the oil viscosity (0W-20, 0W-40, etc.) recommended by the engine manufacturer. VVT systems typically use oil pressure for control. As can be seen in the photo of a Variable Timing Solenoid, small orifices and tight screens can easily be blocked by dirt or oil that is too thick (wrong viscosity).
Check to see if your engine has an EGR valve by looking under "Emission" in the RockAuto catalog. Mechanical and electromechanical VVT parts are found under "Engine."
Tom Taylor,
RockAuto.com
 05-10-2016, 11:56 AM
#622
New Member

Join Date: 05-10-2016
Location: ludlow, ma
Posts: 20
I went to AutoZone and the codes that came up were P0014 and P0013.
And I know shame on me for letting the oil go past its time...I will not let that happen again...
And I know shame on me for letting the oil go past its time...I will not let that happen again...
05-10-2016, 06:52 PM
#623

Join Date: 11-30-2011
Location: Austin, TX
Posts: 9
I also want to thank you for your amazing and informative post. I'm "just a girl"  and though I've repaired belts on cars before, it has been with help - and frankly, I felt accomplished just knowing how to put in my own replacement bulbs for the brake lights, etc. This was a big one for me, but the instructions were so clear, I felt that it was worth making the effort.
Though I was only getting the error code on the one side, I purchased both so I could do them both at the same time. I don't own the tools needed to make this repair, but when I told them what I needed at Advanced Auto Parts, they just let me borrow their own tools. They looked really shocked at me, though..."You're going to do that? Yourself? .... HERE?" I said "Yep - I know what needs to be done, so I'm at least going to try. If it doesn't work out, it doesn't work out."
The most difficult part for me was figuring out how to get the engine cover off. It seemed that my setup was slightly different, but I was able to work my way around it. And I found something very interesting in my exploration. I had not been able to find my air filter in previous attempts, so when I had the car in the shop for a brake and rotor replacement, I asked them to find it and put a new one in. They said it was really hard to find, but they finally got it. And once I pulled that engine cover off (the filter is inside), I saw what a hard time they must have had with it, after all. My wooly hose - the air duct leading from outside the car to the engine had torn in half and "someone" had fed one end of the hose down inside the mouth of the other part of the hose to hide their mistake. The engine hood must have snapped loose with the wooly hose connected, and the person must have swung hard to the right with momentum and tore it.
For what it's worth, I should say - you can't get this type of item from a parts store around town - you have to get this part direct from GM - about $55 (or maybe from a junkyard). I needed something to hold it temporarily, though, and made a great patch using something they had available at Advanced Auto, which was not duct tape - but more like HVAC tape. It stuck to the wooly without pulling up, and allowed a tight seal, so the car could be driven for more than a week until the replacement came in. And that replacement is nothing more than one screw up by the engine, with a rubber end to fit snug onto the wall of the car.
The process of changing out the solenoids went fairly well. The hardest part for me was getting them dislodged - that took more time than anything else. I just had to be gentle and patient, but keep a firm grip and a steady hand. Definitely get yourself some canned air or something and blow that area out before you start removing the bad solenoids. I even had a dead cricket up in the pan.
I started at 7:30 PM, and it quickly got dark, so the guys were nice enough to bring out a light for me. Before long, I had about 6 guys standing around trying to ask me what I was doing, and how I did this, and that, and asking questions. The Manager at Advanced Auto was pretty happy to watch the "procedure" because he felt he would now know how to help someone if they came into the store and needed help with the same issue. It turned into a fun safari adventure. LOL
Anyway, I got everything done and cleaned up, and I knew they closed at 11 - and as I was driving away, I looked down and saw that it was ~12:20, and I felt awful for keeping them behind and being such a slowpoke. Then I thought "WAIT A MINUTE...I disconnected the battery." I looked at my cell phone, and it was only 9:00 PM - so I got both swapped out in 90 minutes, and had NO idea what I was doing.
I wanted to put this out there for anyone feeling under-confident (especially women who don't work on cars!) Get your hands dirty! Well, actually, I recommend you buy the latex gloves for the procedure - LOL - no, but seriously. Try these things, and it only builds confidence. I can thank Whopper for mine. :) Meg
and though I've repaired belts on cars before, it has been with help - and frankly, I felt accomplished just knowing how to put in my own replacement bulbs for the brake lights, etc. This was a big one for me, but the instructions were so clear, I felt that it was worth making the effort.Though I was only getting the error code on the one side, I purchased both so I could do them both at the same time. I don't own the tools needed to make this repair, but when I told them what I needed at Advanced Auto Parts, they just let me borrow their own tools. They looked really shocked at me, though..."You're going to do that? Yourself? .... HERE?" I said "Yep - I know what needs to be done, so I'm at least going to try. If it doesn't work out, it doesn't work out."
The most difficult part for me was figuring out how to get the engine cover off. It seemed that my setup was slightly different, but I was able to work my way around it. And I found something very interesting in my exploration. I had not been able to find my air filter in previous attempts, so when I had the car in the shop for a brake and rotor replacement, I asked them to find it and put a new one in. They said it was really hard to find, but they finally got it. And once I pulled that engine cover off (the filter is inside), I saw what a hard time they must have had with it, after all. My wooly hose - the air duct leading from outside the car to the engine had torn in half and "someone" had fed one end of the hose down inside the mouth of the other part of the hose to hide their mistake. The engine hood must have snapped loose with the wooly hose connected, and the person must have swung hard to the right with momentum and tore it.
For what it's worth, I should say - you can't get this type of item from a parts store around town - you have to get this part direct from GM - about $55 (or maybe from a junkyard). I needed something to hold it temporarily, though, and made a great patch using something they had available at Advanced Auto, which was not duct tape - but more like HVAC tape. It stuck to the wooly without pulling up, and allowed a tight seal, so the car could be driven for more than a week until the replacement came in. And that replacement is nothing more than one screw up by the engine, with a rubber end to fit snug onto the wall of the car.
The process of changing out the solenoids went fairly well. The hardest part for me was getting them dislodged - that took more time than anything else. I just had to be gentle and patient, but keep a firm grip and a steady hand. Definitely get yourself some canned air or something and blow that area out before you start removing the bad solenoids. I even had a dead cricket up in the pan.
I started at 7:30 PM, and it quickly got dark, so the guys were nice enough to bring out a light for me. Before long, I had about 6 guys standing around trying to ask me what I was doing, and how I did this, and that, and asking questions. The Manager at Advanced Auto was pretty happy to watch the "procedure" because he felt he would now know how to help someone if they came into the store and needed help with the same issue. It turned into a fun safari adventure. LOL
Anyway, I got everything done and cleaned up, and I knew they closed at 11 - and as I was driving away, I looked down and saw that it was ~12:20, and I felt awful for keeping them behind and being such a slowpoke. Then I thought "WAIT A MINUTE...I disconnected the battery." I looked at my cell phone, and it was only 9:00 PM - so I got both swapped out in 90 minutes, and had NO idea what I was doing.
I wanted to put this out there for anyone feeling under-confident (especially women who don't work on cars!) Get your hands dirty! Well, actually, I recommend you buy the latex gloves for the procedure - LOL - no, but seriously. Try these things, and it only builds confidence. I can thank Whopper for mine. :) Meg
05-10-2016, 07:20 PM
#624
Moderator

Join Date: 01-23-2009
Location: Fredericksburg,VA
Posts: 25,326
Too bad you went through all of those trial, obviously, before you this forum and the SEARCH tool.
The air filter and the hose are well covered here. A roll of duct tape can repair the hose a lot cheaper than a new part.
The air filter and the hose are well covered here. A roll of duct tape can repair the hose a lot cheaper than a new part.
05-10-2016, 08:32 PM
#625
Platinum Member
Thread Starter

Join Date: 04-09-2006
Location: Vancouver, BC, Canada
Posts: 7,037
So, if it has only happened the once - if it was me, I'd drive it and if the codes come back again, then consider switching the solenoids out.
05-10-2016, 08:34 PM
#626
Platinum Member
Thread Starter
Join Date: 04-09-2006
Location: Vancouver, BC, Canada
Posts: 7,037
Findingmeg - good job - 90 minutes is pretty good considering it was a parking lot job. Well done - now go wash your hands.
05-11-2016, 07:31 AM
#627
New Member
Join Date: 05-10-2016
Location: ludlow, ma
Posts: 20
Ok - those codes definitely point to the intake and exhaust solenoids. It might be a one-time thing if this is the only time it happened for you. One-time thing: the codes can also be generated by dirty oil apparently, and your oil/filter change might have cleared that issue up now that you have fresh clean oil.
So, if it has only happened the once - if it was me, I'd drive it and if the codes come back again, then consider switching the solenoids out.
So, if it has only happened the once - if it was me, I'd drive it and if the codes come back again, then consider switching the solenoids out.
thank you for your input...
05-12-2016, 03:34 AM
#628
Platinum Member
Thread Starter
Join Date: 04-09-2006
Location: Vancouver, BC, Canada
Posts: 7,037
Almost missed it - good find Snoopy on that article in post 621. I think we have had a couple people that encountered solenoid issues after letting their oil-life run down to or past Zero.
and it also reinforces the usage of the manufactures approved oil viscosity.
So people, keep current on your oil changes, and make sure you are using the right oil as per your owners manual.
and it also reinforces the usage of the manufactures approved oil viscosity.
So people, keep current on your oil changes, and make sure you are using the right oil as per your owners manual.
05-18-2016, 04:24 PM
#629
Moderator
Join Date: 01-23-2009
Location: Fredericksburg,VA
Posts: 25,326
OMG.
Don't ask about oil change intervals in this all ready way too long thread. And not so soon after whopper changed his oil.
Use the SEARCH, I bet you will get at least 1,000,000 opinions, in 1,000 threads.
Basically: why do you think GM included the Oil Life Monitor?
Please people don't be answering this here. It is just the wrong place!
06-10-2016, 09:24 PM
#630
Senior Member

Join Date: 03-20-2012
Location: Dallas, TX
Posts: 292
Just changed both int. & exh. solenoids with no problem. Figured while I had them out I would change the oil...being that TX summer is coming, threw in my normal 10W-30. Guess I'll switch it back to 5W-30 on the next change.
Regarding the replacement, things went smoothly. Kudos to Whopper for the how to, which made it a breeze.
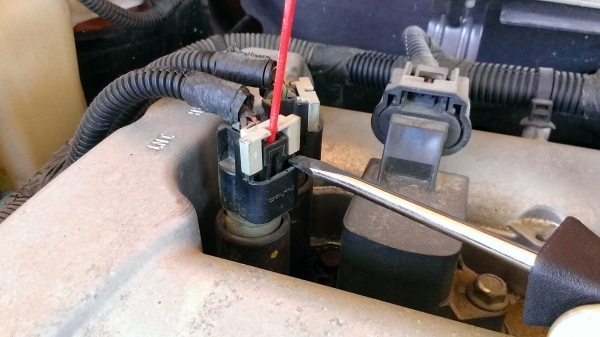
Took this pic of my solution to the "clip lock retainer stopper holder inner hows this thing come out ah crap I broke it" problem...
This is the straw from my WD-40, slides in snuggly & then you can gently push the lock up and remove.
The only snafu I encountered was that I apparently didn't push the MAF connector back on completely and it lit the CEL back up again on my way to work. Re-connected it and no CEL or hard shifting since.
Thanks again to the OP, and everyone who has contributed to this thread!
Regarding the replacement, things went smoothly. Kudos to Whopper for the how to, which made it a breeze.
Took this pic of my solution to the "clip lock retainer stopper holder inner hows this thing come out ah crap I broke it" problem...
This is the straw from my WD-40, slides in snuggly & then you can gently push the lock up and remove.
The only snafu I encountered was that I apparently didn't push the MAF connector back on completely and it lit the CEL back up again on my way to work. Re-connected it and no CEL or hard shifting since.
Thanks again to the OP, and everyone who has contributed to this thread!