Do It yourself factory Fogs
#111
eBay OEM Fit Fog Lights
Hello all!
I bought an aftermarket fog light kit for my 2008 LS that came with the lights, wiring harness, a switch and a relay. These lights snap in like factory lights.
I opted for a different switch (Dorman Part # 84831). This switch fits nicely in the dash where the OEM switch goes and has a blue LED that lights when the fogs are on. You can also get the switch with a green, red or amber LED.
OK, now here is how I hooked everything up.
The switch has 3 connections, 1 goes to ground, 1 goes to the power source and the other to the fog light relay.
I ran 2 wires (1 for ground and 1 to a ignition power source) down to the right side of the console where the interior fuse box is. There I tapped into a green wire that works with the ignition switch. I used a 3M inline splice connector. The ground I connected to the metal stud that holds the front bracket for the side panel snap. I ran the third wire thru the firewall to the coil side of the fog light relay. I used 16 gauge wire for all of my switch connections. (Red, blue and black)
On the switch itself the connection directly behind the LED is ground, the center connection goes to the fog light relay and the other goes to the power source (the green wire I tapped.
Under the hood I got the power for the fog lights from the power distribution panel. I used a 30A rated in line fuse holder (just so the wire sizes matched) and used a 20A fuse. Inside the panel I connected it to one of the 2 connectors on the drivers side of the panel using a standard 1/4" female spade connector. I cut a small notch in the top side of the panel so that when the top was back on the wire didn't get pinched. I mounted the relay with a self drilling screw and that was it. It all works and looks real good.

This is the Dorman (Part # 84831) switch I opted to use instead of the one that came with the kit.
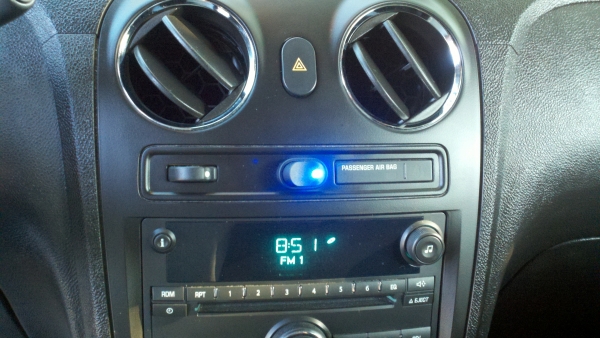
The blue LED illuminates when the fog lights are on.
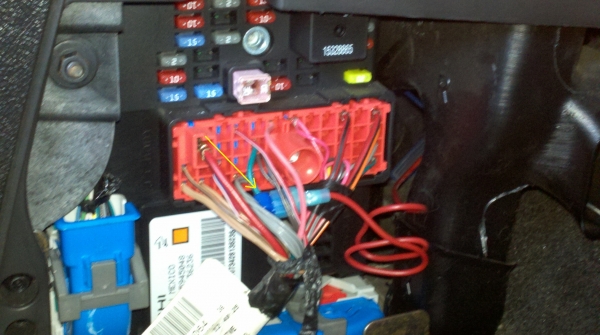
I ran 2 wires (1 for ground and 1 to a ignition power source) down to the right side of the console where the interior fuse box is. There I tapped into a green wire that works with the ignition switch. I used a 3M inline splice connector. The ground I connected to the metal stud that bolts for the front bracket for the side panel snap. I ran the third wire to the coil side of the fog light relay.
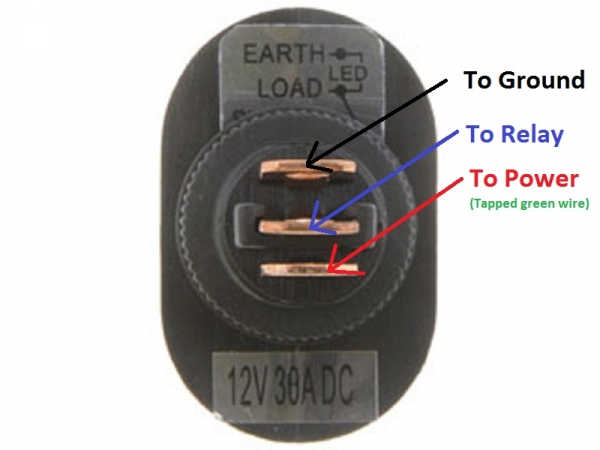
The terminals on the switch are 1/4" (.250)
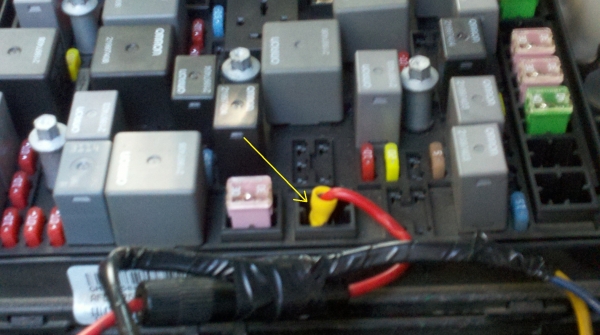
I got the power for the fog lights from the power distribution panel. I used a 30A in line fuse holder with a 20 amp fuse. Inside the panel I connected it to one of the 2 connectors on the driverís side of the panel using a standard 1/4" female spade connector.

I cut a small notch in the top side of the panel so that when the top was back on the wire didn't get pinched.

This is it all buttoned up.

I mounted the relay with a self-drilling screw.

When it was all said and done I flipped the switch and the lights came on.
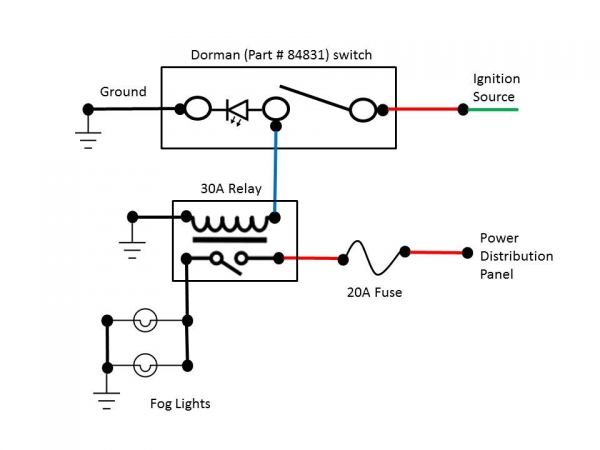
This is how it all looks electronically.
I bought an aftermarket fog light kit for my 2008 LS that came with the lights, wiring harness, a switch and a relay. These lights snap in like factory lights.
I opted for a different switch (Dorman Part # 84831). This switch fits nicely in the dash where the OEM switch goes and has a blue LED that lights when the fogs are on. You can also get the switch with a green, red or amber LED.
OK, now here is how I hooked everything up.
The switch has 3 connections, 1 goes to ground, 1 goes to the power source and the other to the fog light relay.
I ran 2 wires (1 for ground and 1 to a ignition power source) down to the right side of the console where the interior fuse box is. There I tapped into a green wire that works with the ignition switch. I used a 3M inline splice connector. The ground I connected to the metal stud that holds the front bracket for the side panel snap. I ran the third wire thru the firewall to the coil side of the fog light relay. I used 16 gauge wire for all of my switch connections. (Red, blue and black)
On the switch itself the connection directly behind the LED is ground, the center connection goes to the fog light relay and the other goes to the power source (the green wire I tapped.
Under the hood I got the power for the fog lights from the power distribution panel. I used a 30A rated in line fuse holder (just so the wire sizes matched) and used a 20A fuse. Inside the panel I connected it to one of the 2 connectors on the drivers side of the panel using a standard 1/4" female spade connector. I cut a small notch in the top side of the panel so that when the top was back on the wire didn't get pinched. I mounted the relay with a self drilling screw and that was it. It all works and looks real good.

This is the Dorman (Part # 84831) switch I opted to use instead of the one that came with the kit.

The blue LED illuminates when the fog lights are on.

I ran 2 wires (1 for ground and 1 to a ignition power source) down to the right side of the console where the interior fuse box is. There I tapped into a green wire that works with the ignition switch. I used a 3M inline splice connector. The ground I connected to the metal stud that bolts for the front bracket for the side panel snap. I ran the third wire to the coil side of the fog light relay.
The terminals on the switch are 1/4" (.250)

I got the power for the fog lights from the power distribution panel. I used a 30A in line fuse holder with a 20 amp fuse. Inside the panel I connected it to one of the 2 connectors on the driverís side of the panel using a standard 1/4" female spade connector.

I cut a small notch in the top side of the panel so that when the top was back on the wire didn't get pinched.

This is it all buttoned up.

I mounted the relay with a self-drilling screw.

When it was all said and done I flipped the switch and the lights came on.

This is how it all looks electronically.
Last edited by Little_Undertaker; 06-05-2012 at 11:04 AM. Reason: Add Pics and comment
#113
Sounds like a well thought out and executed installation.
I just have one question. A 30 amp fuse? Seems to be a little big for the fog lights, unless that is what is recommended in the instructions. Just wondering.
I just have one question. A 30 amp fuse? Seems to be a little big for the fog lights, unless that is what is recommended in the instructions. Just wondering.
#116
Hello all!
I bought an aftermarket fog light kit for my 2008 LS that came with the lights, wiring harness, a switch and a relay. These lights snap in like factory lights.
I opted for a different switch (Dorman Part # 84831). This switch fits nicely in the dash where the OEM switch goes and has a blue LED that lights when the fogs are on. You can also get the switch with a green, red or amber LED.
OK, now here is how I hooked everything up.
The switch has 3 connections, 1 goes to ground, 1 goes to the power source and the other to the fog light relay.
I ran 2 wires (1 for ground and 1 to a ignition power source) down to the right side of the console where the interior fuse box is. There I tapped into a green wire that works with the ignition switch. I used a 3M inline splice connector. The ground I connected to the metal stud that holds the front bracket for the side panel snap. I ran the third wire thru the firewall to the coil side of the fog light relay. I used 16 gauge wire for all of my switch connections. (Red, blue and black)
On the switch itself the connection directly behind the LED is ground, the center connection goes to the fog light relay and the other goes to the power source (the green wire I tapped.
Under the hood I got the power for the fog lights from the power distribution panel. I used a 30A rated in line fuse holder (just so the wire sizes matched) and used a 20A fuse. Inside the panel I connected it to one of the 2 connectors on the drivers side of the panel using a standard 1/4" female spade connector. I cut a small notch in the top side of the panel so that when the top was back on the wire didn't get pinched. I mounted the relay with a self drilling screw and that was it. It all works and looks real good.
This is the Dorman (Part # 84831) switch I opted to use instead of the one that came with the kit.
The blue LED illuminates when the fog lights are on.
I ran 2 wires (1 for ground and 1 to a ignition power source) down to the right side of the console where the interior fuse box is. There I tapped into a green wire that works with the ignition switch. I used a 3M inline splice connector. The ground I connected to the metal stud that bolts for the front bracket for the side panel snap. I ran the third wire to the coil side of the fog light relay.
The terminals on the switch are 1/4" (.250)
I got the power for the fog lights from the power distribution panel. I used a 30A in line fuse holder with a 20 amp fuse. Inside the panel I connected it to one of the 2 connectors on the driver’s side of the panel using a standard 1/4" female spade connector.
I cut a small notch in the top side of the panel so that when the top was back on the wire didn't get pinched.
This is it all buttoned up.
I mounted the relay with a self-drilling screw.
When it was all said and done I flipped the switch and the lights came on.
This is how it all looks electronically.
Last edited by donbrew; 02-11-2016 at 02:48 PM. Reason: edited pics out
#117
The problem with bringing back a thread this old to ask a question is that the poster may or may not still be active. In this case, Little_Undertaker hasn't been active here since 01-31-2013.


 Sounds like a nice neat install.