
Power Steering Motor Replacement w/Pics
 08-15-2010 | 09:40 PM
#1

Thread Starter
Senior Member
Joined: 09-10-2009
Posts: 170
From: Durham
Power Steering Motor Replacement w/Pics
This should not be necessary, there is now a lifetime special warranty on the PS motor for most years/models.
Big Thanks to ChevyMgr for all of his information and guidance. I think its good that someone in the business cuts through the crap and tries to truly help people. A lot dealers and such just want to milk you for whatever they can and don't want anyone doing things themselves. Without the information he posted in the thread linked below, with diagrams and step by step instructions it would have been much harder.
I have included real pictures so people can get a better view of what has to be done. There are two steps that aren't really mentioned in ChevyMgr's thread and that's removing the knee plate and the knee bolster reinforcement. I will show all that in the coming information. I might not refer to stuff by the correct name either, but I show the part so you know what I am talking about :)
Here is ChevyMgr's original post, I used the instructions here. MAKE SURE YOU REFER TO BOTH POSTS. I didn't want to redo all the stuff he already posted plus I could have missed a step.
https://www.chevyhhr.net/forums/show...1&postcount=14
Tools Needed:
Small socket wrench
12mm socket
10mm socket
7mm socket
Wire cutters(to remove old tie wrap)
Lint Free cloth
Package Contents:
New motor
Tie Wrap
Rubber O-ring
Lubricant
Core Sticker for refund
Installation Time:
1 hour, includes un-boxing, replacement, and cleanup
First the box, the motor, and accessory kit(you know its going to be an easy job when you are only given a o-ring, tie wrap, and some lube )
)


I didn't think about taking pictures until I had already removed the two knee parts so I have pictures of them, but I am just holding it up where they use to go. You will notice in the one picture of the knee bolster with retaining clips the actual reinforcement isn't behind there. I show a picture of it, but not mounted.
So here is a quick overview and then I will post pictures.
1) Remove Knee Bolster. 3xPush Clips, pull out gently, 2x7mm bolts on bottom
2) Remove Knee Bolster Reinforcement. 4x10mm bolts
3) Observe Tie wrap placement
4) Unplug motor power
5) Unplug gray clip so you can access top bolt
6) Clip Tie Wrap
7) Loosen Top Motor Bolt 12mm
8) Loosen Bottom Motor Bolt
9) Pull motor out gently
10) Clean worm spline and inside cover
11) Apply the supplied lubricant to inside of new motor cylinder
12) Slowly insert new motor
13) Finger tighten bolts to hold new motor in place
14) Secure Tie Wrap around motor and power cable
15) Tighten down the 12mm bolts to specifications
16) Attach Power Cable
17) Reinstall Bolster Reinforcement
18) Reinstall Knee Bolster
19) Enjoy power steering once again
So without further ado.
Top shows the push clips, just reach into the little gap and pull them out. Then locate the two 7mm bolts on the bottom and loosen them


Here is the Bolster Reinforcement. 4x10mm bolts.(This is what sits behind the knee cover you just removed)

Be sure the retaining clips don't fall out. This is what the bolster nuts screw into. Mine were very loose.

Observe Tie Wrap Placement

Unplug motor power, here you will also see top and bottom motor bolts

Clip Tie Wrap from the above pictures
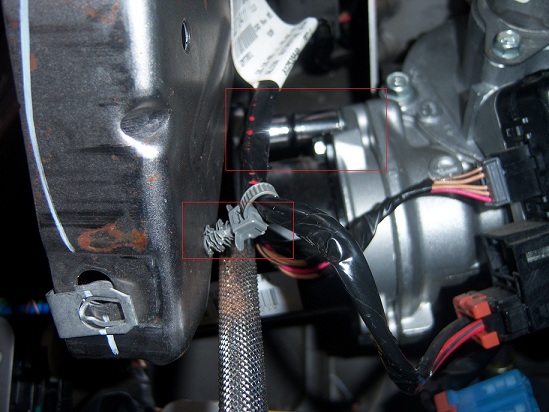
Loosen Top Motor Bolt 12mm socket. This is very tricky. I have highlighted something here because the cables get in the way and you can't get to the top nut properly. You also need a very thin walled socket.
Wiggle the gray tab out so you can move the cable out of your way. In my picture I have the tip sitting in the hole so you can see where it comes from, but I pulled it all the way out and pushed it to the top.
Follow the rest of the instructions and you should be good to go.
Big Thanks to ChevyMgr for all of his information and guidance. I think its good that someone in the business cuts through the crap and tries to truly help people. A lot dealers and such just want to milk you for whatever they can and don't want anyone doing things themselves. Without the information he posted in the thread linked below, with diagrams and step by step instructions it would have been much harder.
I have included real pictures so people can get a better view of what has to be done. There are two steps that aren't really mentioned in ChevyMgr's thread and that's removing the knee plate and the knee bolster reinforcement. I will show all that in the coming information. I might not refer to stuff by the correct name either, but I show the part so you know what I am talking about :)
Here is ChevyMgr's original post, I used the instructions here. MAKE SURE YOU REFER TO BOTH POSTS. I didn't want to redo all the stuff he already posted plus I could have missed a step.
https://www.chevyhhr.net/forums/show...1&postcount=14
Tools Needed:
Small socket wrench
12mm socket
10mm socket
7mm socket
Wire cutters(to remove old tie wrap)
Lint Free cloth
Package Contents:
New motor
Tie Wrap
Rubber O-ring
Lubricant
Core Sticker for refund
Installation Time:
1 hour, includes un-boxing, replacement, and cleanup
First the box, the motor, and accessory kit(you know its going to be an easy job when you are only given a o-ring, tie wrap, and some lube
)I didn't think about taking pictures until I had already removed the two knee parts so I have pictures of them, but I am just holding it up where they use to go. You will notice in the one picture of the knee bolster with retaining clips the actual reinforcement isn't behind there. I show a picture of it, but not mounted.
So here is a quick overview and then I will post pictures.
1) Remove Knee Bolster. 3xPush Clips, pull out gently, 2x7mm bolts on bottom
2) Remove Knee Bolster Reinforcement. 4x10mm bolts
3) Observe Tie wrap placement
4) Unplug motor power
5) Unplug gray clip so you can access top bolt
6) Clip Tie Wrap
7) Loosen Top Motor Bolt 12mm
8) Loosen Bottom Motor Bolt
9) Pull motor out gently
10) Clean worm spline and inside cover
11) Apply the supplied lubricant to inside of new motor cylinder
12) Slowly insert new motor
13) Finger tighten bolts to hold new motor in place
14) Secure Tie Wrap around motor and power cable
15) Tighten down the 12mm bolts to specifications
16) Attach Power Cable
17) Reinstall Bolster Reinforcement
18) Reinstall Knee Bolster
19) Enjoy power steering once again
So without further ado.
Top shows the push clips, just reach into the little gap and pull them out. Then locate the two 7mm bolts on the bottom and loosen them
Here is the Bolster Reinforcement. 4x10mm bolts.(This is what sits behind the knee cover you just removed)
Be sure the retaining clips don't fall out. This is what the bolster nuts screw into. Mine were very loose.
Observe Tie Wrap Placement
Unplug motor power, here you will also see top and bottom motor bolts
Clip Tie Wrap from the above pictures
Loosen Top Motor Bolt 12mm socket. This is very tricky. I have highlighted something here because the cables get in the way and you can't get to the top nut properly. You also need a very thin walled socket.
Wiggle the gray tab out so you can move the cable out of your way. In my picture I have the tip sitting in the hole so you can see where it comes from, but I pulled it all the way out and pushed it to the top.
Follow the rest of the instructions and you should be good to go.
Last edited by donbrew; 06-14-2018 at 05:08 PM. Reason: Grammar Cleanup
08-15-2010 | 09:56 PM
#2

Senior Member
Joined: 03-06-2010
Posts: 6,869
From: Ohio
Nice writeup, man. Thanks!
Hopefully I won't need it though....... There should be a recall on this motor for all the cars that use it. Seriously!
Hopefully I won't need it though....... There should be a recall on this motor for all the cars that use it. Seriously!
08-15-2010 | 11:26 PM
#3

Platinum Member
Joined: 01-09-2007
Posts: 15,983
From: SE USA
Good pics & write up, Thanks. & Keep your reciepts, in case GM does a recall.. 
08-16-2010 | 01:01 AM
#5
Platinum Member
Joined: 01-09-2007
Posts: 15,983
From: SE USA
Good deal, so did this fix your problem ?
08-16-2010 | 08:57 AM
#6
Thread Starter
Senior Member
Joined: 09-10-2009
Posts: 170
From: Durham
Seems so. It was 93 yesterday and after getting it fixed the wife and I decided to drive my car when we went out afterwords. Didn't drive to terribly far, but usually in that heat the power steering would trip before I even got out of our neighborhood.
We are going to drive just it for the next couple of days to truly find out.
We are going to drive just it for the next couple of days to truly find out.
08-16-2010 | 06:06 PM
#7
Thread Starter
Senior Member
Joined: 09-10-2009
Posts: 170
From: Durham
All day in 95 degree heat and its as smooth as butta. Mission Accomplished.
08-16-2010 | 06:17 PM
#9

Founding Member
Joined: 11-23-2007
Posts: 8,210
From: Texas
Nice write up Stryker. This should help any members who have this breakdown. 
08-16-2010 | 11:36 PM
#10
Platinum Member
Joined: 01-09-2007
Posts: 15,983
From: SE USA
Seems so. It was 93 yesterday and after getting it fixed the wife and I decided to drive my car when we went out afterwords. Didn't drive to terribly far, but usually in that heat the power steering would trip before I even got out of our neighborhood.
We are going to drive just it for the next couple of days to truly find out.
We are going to drive just it for the next couple of days to truly find out.