Slide_Rite's HHR - Pics, Mods & More!
#102
#104
That picture is the top 1/2 to 3/8 inch step down, with the pipe nipple pressed in, I cut the threaded end off and reamed the brass out until the 3/8 plunger would freely slide thru.
This picture is of the bottom which slides right over the shifter stick with a little tap from a neoprene mallet
This picture is of the bottom which slides right over the shifter stick with a little tap from a neoprene mallet
#105
Been patiently waiting for Spring & we finally got it here in Dallas. Temps in the low 80's with a good breeze...time to install some new parts!! 
My stock headlights are yellowing & hazy. In addition to the possible decrease in light output, they just look horrible.... Finally picked up a set of Depo's & switched them out today.


Since the front was getting a fresh look and the mesh in my 3-bar was pretty chipped up, they were removed & sprayed with black plasti-dip.


It's crazy how much of an improvement the new headlights make...just an insane difference. Looks great with the lower grill too, not sure why I waited so long to put it in.

I also decided to replace the rears...years ago, and finally bought a set of Bermuda black LEDs from Maggie @ R&S. So out with the old & in with the new!
Stockers...

Bermuda black....aww yeah!

Hopefully I will be able to get to my SS brake upgrade next weekend. My EBC Redstuff pads are one the way, but the rest is ready & waiting.

My stock headlights are yellowing & hazy. In addition to the possible decrease in light output, they just look horrible.... Finally picked up a set of Depo's & switched them out today.


Since the front was getting a fresh look and the mesh in my 3-bar was pretty chipped up, they were removed & sprayed with black plasti-dip.


It's crazy how much of an improvement the new headlights make...just an insane difference. Looks great with the lower grill too, not sure why I waited so long to put it in.

I also decided to replace the rears...years ago, and finally bought a set of Bermuda black LEDs from Maggie @ R&S. So out with the old & in with the new!
Stockers...

Bermuda black....aww yeah!

Hopefully I will be able to get to my SS brake upgrade next weekend. My EBC Redstuff pads are one the way, but the rest is ready & waiting.

Last edited by Slide_Rite; 03-29-2015 at 07:43 PM.
#108
#110
...and now, this weather break.
We finally caught a break from the rain today in my part of TX. Yay! Time to work on the ride...
First a few stock items...prior to transformation.
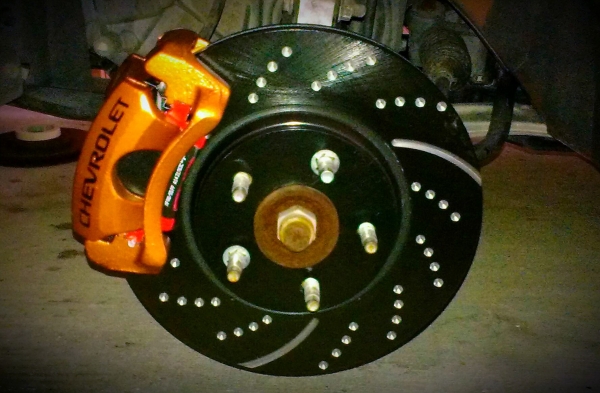
My current setup looks pretty rough...to put it nicely. Switching to larger SS rotors, Redstuff pads...both EBC. Painting the calipers VHT Burnt Copper & adding a black Chevrolet decal. Also, sprayed the lug nuts flat black & plasti-dipped the wheels in black.

Clean with note cards in place & ready to be sprayed with the first layer of dip.

The stock LT brakes. Not sure what pads are on it, but it's ready for an upgrade.


Now on to the fun stuff!!
Cleaned. Primed. Painted.


Comparing the old with the new...

Picked up a caliper hardware kit at my local part store for the new caliper brackets. Installed the guide pins with new lube & boots. All new hardware to guide in the new Redstuff pads.

Everything installed & ready to go.

Sure is a darn sight prettier to look at now...

Only had to change the fronts, but will paint the rear drums when I do them. Planning to spray them black, but I might go with copper like the fronts. I'll decide later...

First a few stock items...prior to transformation.
My current setup looks pretty rough...to put it nicely. Switching to larger SS rotors, Redstuff pads...both EBC. Painting the calipers VHT Burnt Copper & adding a black Chevrolet decal. Also, sprayed the lug nuts flat black & plasti-dipped the wheels in black.

Clean with note cards in place & ready to be sprayed with the first layer of dip.

The stock LT brakes. Not sure what pads are on it, but it's ready for an upgrade.


Now on to the fun stuff!!
Cleaned. Primed. Painted.


Comparing the old with the new...

Picked up a caliper hardware kit at my local part store for the new caliper brackets. Installed the guide pins with new lube & boots. All new hardware to guide in the new Redstuff pads.

Everything installed & ready to go.

Sure is a darn sight prettier to look at now...

Only had to change the fronts, but will paint the rear drums when I do them. Planning to spray them black, but I might go with copper like the fronts. I'll decide later...

Last edited by Slide_Rite; 05-15-2015 at 03:12 AM.


