
Programing New 2 Way Remote...How?
 05-16-2009, 08:21 PM
#11
Senior Member

Join Date: 06-25-2008
Location: Austin, TX
Posts: 305
Hey, Patrick49, wada ya mean "increased range would be nice". Is that what you're going to tell the little lady? You're getting it for the functionality of it? Or are you going to be truthful, like the rest of us - "Oh, new toy! I want!" HA HA! I think it's cool looking, that's 'nuff for me!
Depending on the size of the antenna, that could nix the whole thing for me...very particular about extraneous crap on my car (i.e. the rear wiper and the XM antenna). Unless they put it on the inside of the glass?
 05-16-2009, 11:18 PM
#13
Senior Member

Join Date: 03-29-2009
Location: Quebec City
Posts: 1,097
A question for you ChevyMgr. I don't have AP3, so can they install the 2 way remote start on my vehicle?
Thanks.

 05-17-2009, 07:40 AM
#15
Senior Member
Thread Starter

Join Date: 07-05-2008
Location: Akron Ohio
Posts: 5,464
2-way technology and a convenient display screen shows the vehicles current status (locked or remote-start engaged, for instance) and critical vehicle data, including tire air pressure, fuel level, odometer and theft alarm status. This fob offers greater operating range then the factory keyless entry system, and can control a second, ARSS-equipped vehicels
The one on the 09 will start you HHR at short range and lock or unlock your doors.
The 2010 will offer this system or one similar. THey have imporved it but I have not seen it yet.
The big key here is this will start you HHR from around 1,000 feet. THis means I can do it from my desk at work and not have to walk to the end of the building for me.
Chevy Mgr thanks for the help here. Is it possible to post the instructions so that this may answer the many questions?
05-17-2009, 08:12 AM
#16
New Member

Join Date: 06-28-2008
Location: buffalo ny
Posts: 10
2 way remote
i have the 2 way system on my 08 hhr.works good.remote a little big,my daughter calls it a cell phone.antenna is also big and goes on r/r qtr window on inside.you have to replace a module located in headliner near windshield,add the antenna and you get 2 new remotes,one 2 way remote and 1 regular.the remotes that came with vehicle will become no good.i installed this myself.iam also a chevy tech.you can not program it at home.there is alot of steps to install this system.other vehicles are alot easier to install.
05-17-2009, 09:02 AM
#18
Founding Member

Join Date: 11-23-2007
Location: Texas
Posts: 8,210
05-17-2009, 09:16 AM
#19
Founding Member
Join Date: 11-23-2007
Location: Texas
Posts: 8,210
Instructions 2008 HHR
2-Way Remote Start and Door Lock Transmitter Package Installation
Accessories Part Number
19157234
Kit Usage
This kit is designed to add 2-way remote start with extended range and enhanced functionality.
These instructions only apply to 2008 model year and beyond vehicles. There is a different RCDLR and antenna location for the 2007 model year.
The 2-Way RCDLR has been designed to operate with the antenna included in the kit. The antenna type, gain, cable loss, and impedance have been chosen to meet FCC and Industry Canada requirements for radio communication equipment. Do not substitute the antenna supplied with any other part. Any modifications to the antenna or use of an antenna not designed for this system could void authorization to use this equipment.
Kit Contents Qty
Description
1- Remote Control Door Lock, 2-Way Remote Start and Information Display Receiver (2-Way RCDLR)
1- 2-Way Remote Start and Door Lock Transmitter (With Information Display)
1- 2-Way Remote Start, Door Lock and Information Display Antenna
1- Factory Style 1-way Transmitter
1- Service Part ID Label
1- 2-Way Advanced Remote Start Owner Manual
Special Tools
• Scan Tool with capability of communicating on GMLAN
• Service Programming System (SPS - TIS2WEB or equivalent)
• J-46079 Tire Pressure Monitor Diagnostic Tool
• Surface Cleaner (50 percent isopropyl alcohol, FS-1082 hi-flash naphtha or equivalent)
• Glass Primer and Adhesion Promoter GM P/N 12378555 (Canadian P/N 88901239)
Procedure
Important: Please review this entire procedure before trying to perform it.
Using the Scan Tool, perform the Copy and Paste TPM Information procedure. This will extract the TPM Tire Type information as well as the sensor data from the existing RCDLR prior to its replacement and store this information in the scan tool. After RCDLR replacement, the tire type and sensor data stored in the scan tool is written to the new RCDLR, negating the need to perform the tire type setup and sensor learn procedure. This must be performed BEFORE removing the old RCDLR. Refer to Remote Control Door Lock Receiver Programming and Setup.
Physically replace the factory Remote Control Door Lock Receiver (RCDLR) with the 2-way RCDLR included in the kit. Refer to Remote Control Door Lock Receiver Replacement. Do not program or reassemble yet.
Clean the inside of the right rear quarter glass with a surface cleaner (50 percent isopropyl alcohol, FS-1082 hi-flash naphtha or equivalent).
Dry the glass thoroughly using a lint-free cloth.
Important:
• The adhesion promoter must be used to assure adequate bonding of the antenna.
• Mask off or protect areas before applying the adhesion promoter.
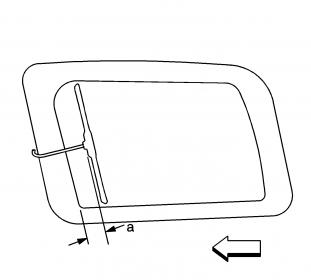
Apply Glass Adhesion Promoter GM P/N 12378555 (Canadian P/N 88901239) to the rear quarter window in the area where you will install the antenna. Follow the Glass Adhesion Promoter instructions on the product label. Use a = 90 mm (3 9/16 in).
Important:
• Position the antenna according to the figure provided.
• Do not touch the adhesive pad on the antenna.
Remove the protective film from the adhesive pad on the antenna.
Align the antenna to the glass blackout area according to the figure, using a = 90 mm (3 9/16 in).
Press firmly all along the adhesive pad of the antenna, including all four corners of the adhesive pad, in order to ensure proper adhesion to the glass.
Hold pressure on the antenna for 10-30 seconds.
Ensure that no gaps occur between the antenna adhesive pad and the glass.
Important:
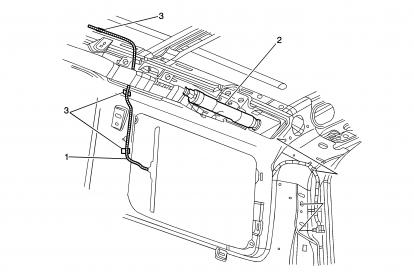
• Do not bend the roof side rail inflatable restraint module brackets during installation of the antenna.
• Route the antenna cable above the roof side rail inflatable restraint module along the passenger side of the vehicle.
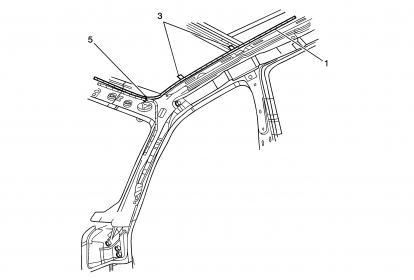
Route the antenna cable (1) behind the roof side rail inflatable restraint module bracket (2) and secure to the roof along the passenger side of the vehicle with five adhesive wire-wraps (3).
Secure the antenna cable (1) to the main body wiring harness (5) at the front header (7) with two tie wraps (6).
Connect the antenna (1) to the 2-Way RCDLR (4).
Reassemble. Refer to Remote Control Door Lock Receiver Replacement.
The 2-Way RCDLR will not work until it is programmed. Using the Scan Tool and SPS terminal, program the 2-Way RCDLR. Select the controller "RCDLR Remote Control Door Lock Receiver 2 Way - with Yellow Label". Select the options that the VIN is equipped with. After the 2-Way RCDLR is programmed, if the vehicle is equipped with TPMS, perform the Paste TPM Information procedure or perform the tire type and pressure setup and sensor learn procedure. Refer to Remote Control Door Lock Receiver Programming and Setup.
Check the 2-Way transmitter battery for full charge. Press the unlock button on the 2-Way transmitter eight times consecutively and then check the battery gauge in the upper right corner of the LCD display. If the battery icon is flashing, shows two bars or less, or the display flickers or fades out, replace the battery. Only if the gauge reads full (three bars), the transmitter can be released to the customer. To replace the battery:
16.1. Use a lithium coin cell battery, type CR2450 (GM P/N 12493150).
16.2. Gently pry the transmitter halves apart all the way around, using a nylon trim panel tool or similar object, starting at the notch at the bottom.
16.3. Remove the battery and insert a new one, making sure the positive side is down (towards the back of the transmitter).
16.4. Snap the transmitter halves together, making sure the gap is even all the way around.
16.5. Check the new battery. Press the unlock button 8 times consecutively and then check the battery gauge.
Program the 2-way transmitter and the factory styled 1-way transmitter included in the kit to the 2-way RCDLR.
Turn the ignition off for 1 minute.
Discard the vehicle factory transmitters, as they will no longer be functional.
Apply the service part ID label to the bottom of the existing Service Parts ID Label. This label is for future transmitter service part identification.
20.1. The surface temperature should not be less than 65�F (21�C).
20.2. Clean the surface with a suitable solvent (50 percent isopropyl alcohol, FS-1062 hi-flash naphtha or equivalent).
20.3. Dry the surface with a clean cloth.
20.4. Peel the liner from the backside of the label, being careful not to touch the adhesive or allow dirt or any foreign material to come in contact with it.
20.5. Carefully align the label to the surface, press firmly, and smooth out.
Turn the ignition on.
Using the scan tool, retrieve any diagnostic trouble codes (DTCs) from all of the modules.
Clear all DTCs.
Remove the scan tool.
Operate the 2-way and factory style 1-way transmitters in order to verify correct system operation. Refer to Remote Vehicle Start within Keyless Entry System Description and Operation. Press a command button with the vehicle ignition ON in order to synchronize the 2-Way transmitter clock to the vehicle clock.
Drive the vehicle above 25 mph for at least two minutes. This is to update the tire pressure displays.
Add the transmitters to the customer key rings.
Place the 2-Way Advanced Remote Start owner manual in instrument panel compartment.
Keep the vehicle dry. Allow 6-8 hours, at 15�C (60�F), for the antenna adhesive to cure after installation.
Accessories Part Number
19157234
Kit Usage
This kit is designed to add 2-way remote start with extended range and enhanced functionality.
These instructions only apply to 2008 model year and beyond vehicles. There is a different RCDLR and antenna location for the 2007 model year.
The 2-Way RCDLR has been designed to operate with the antenna included in the kit. The antenna type, gain, cable loss, and impedance have been chosen to meet FCC and Industry Canada requirements for radio communication equipment. Do not substitute the antenna supplied with any other part. Any modifications to the antenna or use of an antenna not designed for this system could void authorization to use this equipment.
Kit Contents Qty
Description
1- Remote Control Door Lock, 2-Way Remote Start and Information Display Receiver (2-Way RCDLR)
1- 2-Way Remote Start and Door Lock Transmitter (With Information Display)
1- 2-Way Remote Start, Door Lock and Information Display Antenna
1- Factory Style 1-way Transmitter
1- Service Part ID Label
1- 2-Way Advanced Remote Start Owner Manual
Special Tools
• Scan Tool with capability of communicating on GMLAN
• Service Programming System (SPS - TIS2WEB or equivalent)
• J-46079 Tire Pressure Monitor Diagnostic Tool
• Surface Cleaner (50 percent isopropyl alcohol, FS-1082 hi-flash naphtha or equivalent)
• Glass Primer and Adhesion Promoter GM P/N 12378555 (Canadian P/N 88901239)
Procedure
Important: Please review this entire procedure before trying to perform it.
Using the Scan Tool, perform the Copy and Paste TPM Information procedure. This will extract the TPM Tire Type information as well as the sensor data from the existing RCDLR prior to its replacement and store this information in the scan tool. After RCDLR replacement, the tire type and sensor data stored in the scan tool is written to the new RCDLR, negating the need to perform the tire type setup and sensor learn procedure. This must be performed BEFORE removing the old RCDLR. Refer to Remote Control Door Lock Receiver Programming and Setup.
Physically replace the factory Remote Control Door Lock Receiver (RCDLR) with the 2-way RCDLR included in the kit. Refer to Remote Control Door Lock Receiver Replacement. Do not program or reassemble yet.
Clean the inside of the right rear quarter glass with a surface cleaner (50 percent isopropyl alcohol, FS-1082 hi-flash naphtha or equivalent).
Dry the glass thoroughly using a lint-free cloth.
Important:
• The adhesion promoter must be used to assure adequate bonding of the antenna.
• Mask off or protect areas before applying the adhesion promoter.
Apply Glass Adhesion Promoter GM P/N 12378555 (Canadian P/N 88901239) to the rear quarter window in the area where you will install the antenna. Follow the Glass Adhesion Promoter instructions on the product label. Use a = 90 mm (3 9/16 in).
Important:
• Position the antenna according to the figure provided.
• Do not touch the adhesive pad on the antenna.
Remove the protective film from the adhesive pad on the antenna.
Align the antenna to the glass blackout area according to the figure, using a = 90 mm (3 9/16 in).
Press firmly all along the adhesive pad of the antenna, including all four corners of the adhesive pad, in order to ensure proper adhesion to the glass.
Hold pressure on the antenna for 10-30 seconds.
Ensure that no gaps occur between the antenna adhesive pad and the glass.
Important:
• Do not bend the roof side rail inflatable restraint module brackets during installation of the antenna.
• Route the antenna cable above the roof side rail inflatable restraint module along the passenger side of the vehicle.
Route the antenna cable (1) behind the roof side rail inflatable restraint module bracket (2) and secure to the roof along the passenger side of the vehicle with five adhesive wire-wraps (3).
Secure the antenna cable (1) to the main body wiring harness (5) at the front header (7) with two tie wraps (6).
Connect the antenna (1) to the 2-Way RCDLR (4).
Reassemble. Refer to Remote Control Door Lock Receiver Replacement.
The 2-Way RCDLR will not work until it is programmed. Using the Scan Tool and SPS terminal, program the 2-Way RCDLR. Select the controller "RCDLR Remote Control Door Lock Receiver 2 Way - with Yellow Label". Select the options that the VIN is equipped with. After the 2-Way RCDLR is programmed, if the vehicle is equipped with TPMS, perform the Paste TPM Information procedure or perform the tire type and pressure setup and sensor learn procedure. Refer to Remote Control Door Lock Receiver Programming and Setup.
Check the 2-Way transmitter battery for full charge. Press the unlock button on the 2-Way transmitter eight times consecutively and then check the battery gauge in the upper right corner of the LCD display. If the battery icon is flashing, shows two bars or less, or the display flickers or fades out, replace the battery. Only if the gauge reads full (three bars), the transmitter can be released to the customer. To replace the battery:
16.1. Use a lithium coin cell battery, type CR2450 (GM P/N 12493150).
16.2. Gently pry the transmitter halves apart all the way around, using a nylon trim panel tool or similar object, starting at the notch at the bottom.
16.3. Remove the battery and insert a new one, making sure the positive side is down (towards the back of the transmitter).
16.4. Snap the transmitter halves together, making sure the gap is even all the way around.
16.5. Check the new battery. Press the unlock button 8 times consecutively and then check the battery gauge.
Program the 2-way transmitter and the factory styled 1-way transmitter included in the kit to the 2-way RCDLR.
Turn the ignition off for 1 minute.
Discard the vehicle factory transmitters, as they will no longer be functional.
Apply the service part ID label to the bottom of the existing Service Parts ID Label. This label is for future transmitter service part identification.
20.1. The surface temperature should not be less than 65�F (21�C).
20.2. Clean the surface with a suitable solvent (50 percent isopropyl alcohol, FS-1062 hi-flash naphtha or equivalent).
20.3. Dry the surface with a clean cloth.
20.4. Peel the liner from the backside of the label, being careful not to touch the adhesive or allow dirt or any foreign material to come in contact with it.
20.5. Carefully align the label to the surface, press firmly, and smooth out.
Turn the ignition on.
Using the scan tool, retrieve any diagnostic trouble codes (DTCs) from all of the modules.
Clear all DTCs.
Remove the scan tool.
Operate the 2-way and factory style 1-way transmitters in order to verify correct system operation. Refer to Remote Vehicle Start within Keyless Entry System Description and Operation. Press a command button with the vehicle ignition ON in order to synchronize the 2-Way transmitter clock to the vehicle clock.
Drive the vehicle above 25 mph for at least two minutes. This is to update the tire pressure displays.
Add the transmitters to the customer key rings.
Place the 2-Way Advanced Remote Start owner manual in instrument panel compartment.
Keep the vehicle dry. Allow 6-8 hours, at 15�C (60�F), for the antenna adhesive to cure after installation.
